Export Your Images Like a Boss
Jul 01, 2024
By Tom Dalt
I think we’ll all agree that aviation photography is a unique niche that combines passion, precision, and, of course, the right tools and techniques. One critical aspect of the post-processing workflow is choosing the appropriate file type to save and export your images. Whether you’re showcasing your work on social media, exporting to the darkest depths of your hard drives or preparing for print, understanding the nuances of image formats is crucial. In this blog we’ll dive into the world of image types and learn exactly what to consider when saving your images!
What you’ll learn
Sparked by a great question in The Merge by member James Cutting, in this blog I hope to help you better understand the different image file formats and – more importantly – when & why to use them! I’ll then finish the blog by showing you my exact export settings, plus even give you some super handy Lightroom export templates for you to download!
By the end of this blog you’ll be able to…
– Understand what we mean by image file format
– Understand why we need different image file formats
– Understand the different types of image file format
– Understand limitations of different image file formats
– Understand when to use each format
– Export your images like a boss!
So first let us take a look at what an image file format is and why we need them.
What is an image file format and why do we need them?
To put it simply, an image file format is a standard way of encoding and storing digital images – taking all of those 1s and 0s and encoding it into something that can be understood and graphically displayed. It defines how information is organised and compressed into a file, which includes not only the digital representation of the visual content but also metadata such as colour profiles, resolution, and potentially additional elements like layers, alpha channels, and more.
The choice of an image file format affects the quality, size, and usability of an image so it’s important to get it right! Different formats use different methods to compress and store this data, leading to variations in image quality, file size, and compatibility with software and devices.
Before we dive into the different types of image file formats, here are a few key points that you might like to understand:
Data Compression: Most image file formats use some form of compression to reduce the file size. This can be lossless, which means no data is lost and the original image can be perfectly reconstructed, or lossy, which means some image quality is sacrificed for smaller file size.
Color Depth: Image formats can support various colour depths, from simple black-and-white images to 16-million colours in true colour images, and even more in high dynamic range (HDR) images. Colour depth and profiles is an entire chapter in itself, so we’ll leave the details of this for another blog!
Transparency: Some formats support transparency, which allows the background of the image to be seen through designated transparent areas.
Layers and Additional Features: Advanced formats like PSD (Photoshop Document) and TIFF can include layers, paths, and other features that are useful in professional editing workflows. Again, we won’t dive into this here, but it’s useful to at least know that some formats extend what you can do with the file.
Understanding image file formats and their characteristics is essential for us aviation photographers as it enables us to choose the most appropriate format for our needs, balancing factors like image quality, file size, and compatibility. After all – why spend ££££ on your camera gear, only to compromise those precious pixels with the wrong export settings?
So, what are the different image formats?
Although there are many different image file types out there, there are some file types that you are more likely to encounter as an aviation photographer than others. Having a basic understanding of these file types will really help you out and give you enough knowledge to export your images for nearly any purpose – epic!
So let’s get right to it…
RAW: The uncompressed and unprocessed data straight from your camera’s sensor. Think of it as the digital equivalent of a film negative – full of potential, awaiting development. I always recommend shooting in RAW format on your camera to ensure you capture as much information as possible. A RAW file gives you maximum flexibility to play with the colours or adjust the exposure in post-processing. With often huge file sizes, think of RAW as the king of image file types – every pixel packed with information, beyond what you can see on the screen.
Top tip: Don’t shoot in RAW on your camera? What are you waiting for! Dive into your camera settings and go RAW …now!
JPEG (JPG): This is undeniably the most common format that we encounter as photographers. It’s typically the format we all start out shooting in too, before we realise why RAW is so much better! However, JPG is what we call a compressed format – in other words, it strips out data from the file in order to reduce its file size. This goes further in the sense that JPG actually uses lossy compression which means that the image quality may be impacted.
However, as far as photography is concerned, so long as you follow the suggested export settings later in this blog, you’ll struggle to notice this lossy compression, due to the nature of photography. This lossy compression typically only becomes a factor when you export as a JPG, then re-export and re-export again… the multiple compression passes can lead to some visual artefacts and quality degradation.
So, to summarise, JPG is a compressed and lossy file format, stripping out data on each export in order to reduce file size. However, as far as photography is concerned, you are unlikely to notice any visual differences after export, making it a great choice for sharing your images online.
Top tip: Try to avoid opening a JPG and re-saving – over time, this could lead to seeing some lossy compression. It is far better to go back to your original RAW, make any changes here and then re-export as a JPG, to minimise the passes of JPG compression.
PNG: Often the go-to for digital artists and graphic designers, PNG is a versatile file format that maintains clarity and detail, making it ideal for images with text or sharp lines. Unlike JPG, it also supports transparency which is why you may have noticed most graphics or overlays are saved in PNG format.
In terms of compression, PNG uses what we call a lossless compression, which ensures that no visual image data is lost during the saving process, preserving the quality of your edits. For us aviation photographers, this means your edits maintain their crispness and colour fidelity. However, the tradeoff is larger file sizes compared to JPG, which can be a concern for online platforms and loading times. Generally speaking, PNG is best suited to graphic media (illustrations, logos, text etc), rather than photographic.
Top tip: If you’re looking to create an overlay or want to add a text layer on to one of your images, export this as a PNG – with the added benefit of being able to leave the graphic background transparent.
TIFF: Aaaand in the red corner, we have the heavyweight champion of image files, TIFF. This is the format of choice when you need to preserve every ounce of quality, often used in the publishing and printing industries. With options for lossless compression, TIFF files maintain all the image data, which means they’re perfect for extensive editing and are print-ready. For those stunning aviation shots that deserve to be framed and hung on a wall, TIFF is your go-to.
Remember, these files can be enormous, so they’re not suitable for quick sharing or online use where speed and data use are factors. You may notice if you’ve ever used applications such as Topaz, that often these applications will save your images as TIFF files. Although not quite a “RAW”, typically speaking, an uncompressed TIFF is an uncompromised choice for being able to edit your image further with minimal data loss.
Top tip: For images that you intend to print or edit heavily in software like Photoshop, TIFF is your best friend. Keep in mind, storage space and file transfer times can be significant, so use this format selectively.
WEBP: A relatively new player in the image format game, WEBP is Google’s answer to the call for high-quality images with reduced file sizes. It’s a modern format designed for the web, offering both lossy and lossless compression options. This means you can achieve image qualities comparable to JPEG and PNG but with smaller file sizes that load faster online.
For aviation photographers looking to showcase their work on websites or social media without sacrificing too much quality, WEBP could be seen as a smart choice. That said, WEBP is still not compatible on all browsers, and for this reason I do not recommend saving your images as WEBP. Typically, conversion to WEBP will be handled by the platform you upload to – for example, here on COAP Online we convert and display your images in WEBP on the Inspire gallery grid to improve load times. However, since not all browsers are compatible, we also have backup JPG files ready to display just in case.
Top tip: Let your image sharing platform of choice (COAP Online!) take care of WEBP conversion. Many platforms have already adopted this process, serving your images in WEBP for compatible browsers.
A handy summary for choosing your file type
So now we’ve looked at an overview of the main file types available to us, let’s recap and take a look at which file type is best suited to the following purposes…
In Camera: No question about it, if you plan to edit your shots, always shoot in RAW. Unless you are on a professional shoot where you need to deliver a batch of images to a client quickly for review, often a RAW+JPG option is a great choice here. With this option, you can quickly send the JPG’s over to your client but also have the RAW files available to edit at a later date, once the final images have been chosen.
Online Sharing: With their smaller file size and wide compatibility, JPG is the best choice for uploading photos online. However, they lose some data each time they’re edited and saved so avoid re-saving a JPG multiple times.
Editing: RAW files are the gold standard for post-processing flexibility, allowing you to push your edits to the limit! However, the RAW file format requires a specialist RAW decoder to be able to convert your camera sensor data to an actual image, meaning RAW files won’t open up in all image viewers. For that reason, I don’t recommend using RAW for anything other than capture and edit.
Archiving: TIFFs are excellent for saving edited photos without quality loss, in a format that can be easily opened by any image editor. You can also use JPG compression within a TIFF file export, but just remember that you will be losing the uncompressed TIFF flexibility when you do this, so choose uncompressed TIFF if you plan to make further changes. DNG is another format not mentioned in this blog, that can provide similar benefits to TIFF when it comes to archiving images.
Print: For printing, the high-quality data retention of TIFF files is your best choice. We do not need the full flexibility of RAW files at this post-edit stage, but the TIFF ensures a friendly format that can be read by most high end printers and printing software (and TIFF can also contain layer data – useful if you need to send print guide overlays to your print supplier for example!). Some print companies may ask for your images in JPG, and as we’ve learnt above, generally speaking, you will not notice any visual degradations saving in JPG. So the rule of thumb here – choose TIFF unless the print company says otherwise!
Web Performance: WEBP is emerging as the best choice for online images, delivering high-quality visuals with smaller file sizes for faster loading times. However, we saw that not all browsers are capable of displaying WEBP images, so it’s best to leave any WEBP conversion to your image platform(s) of choice.
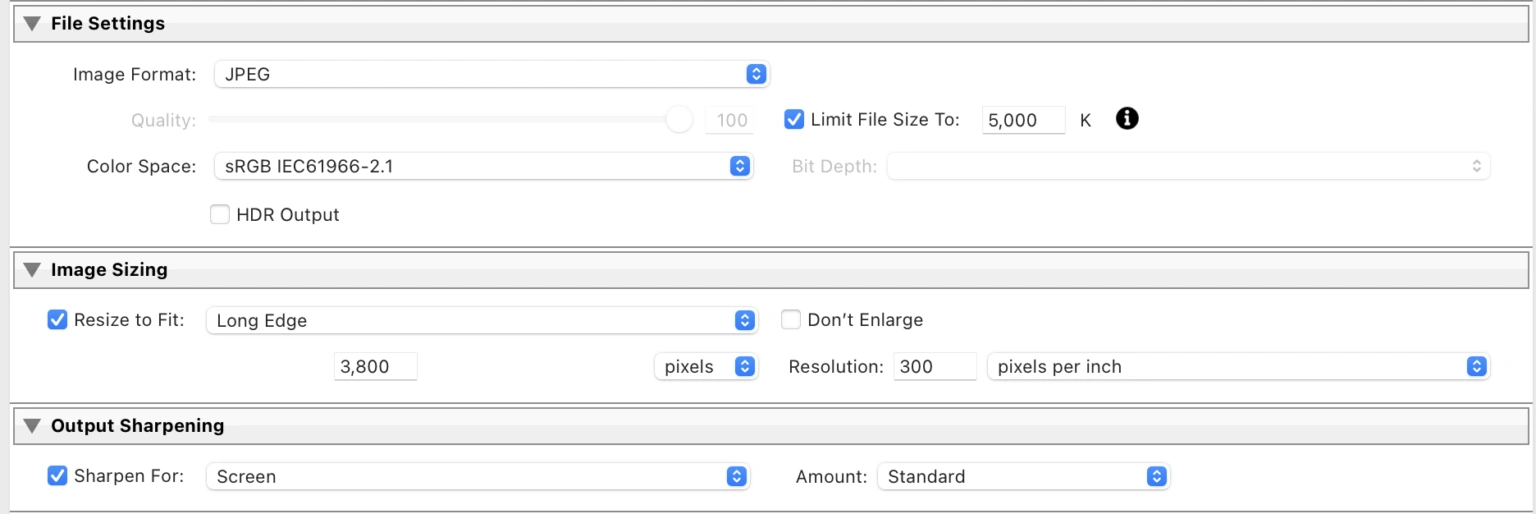
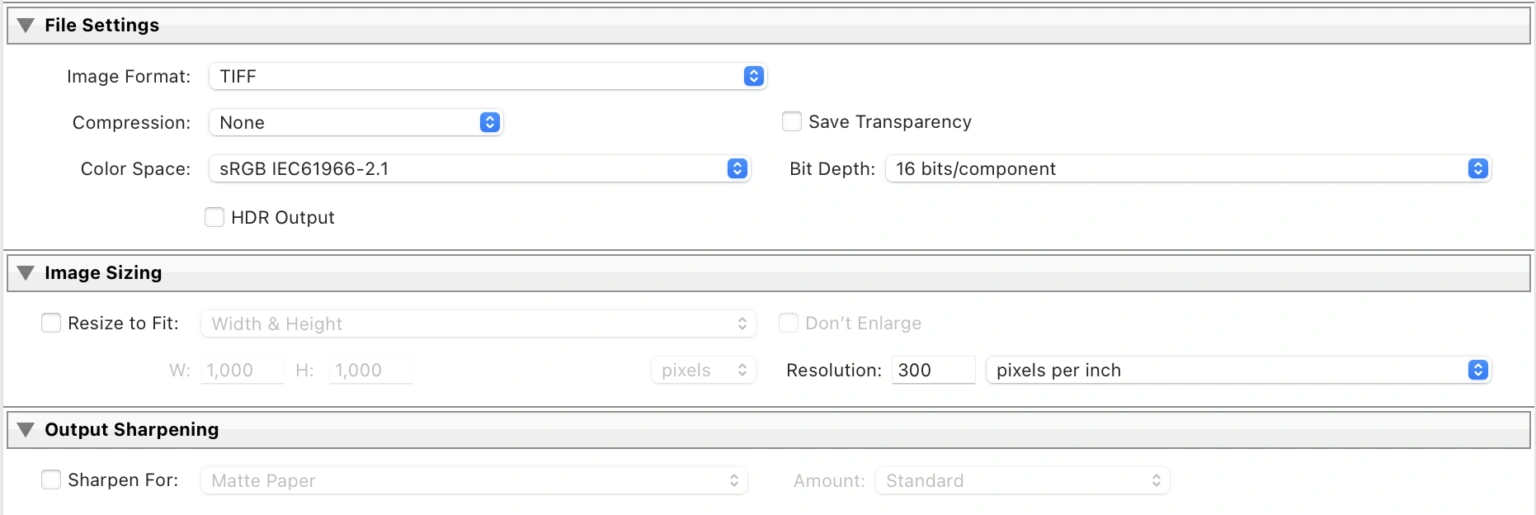
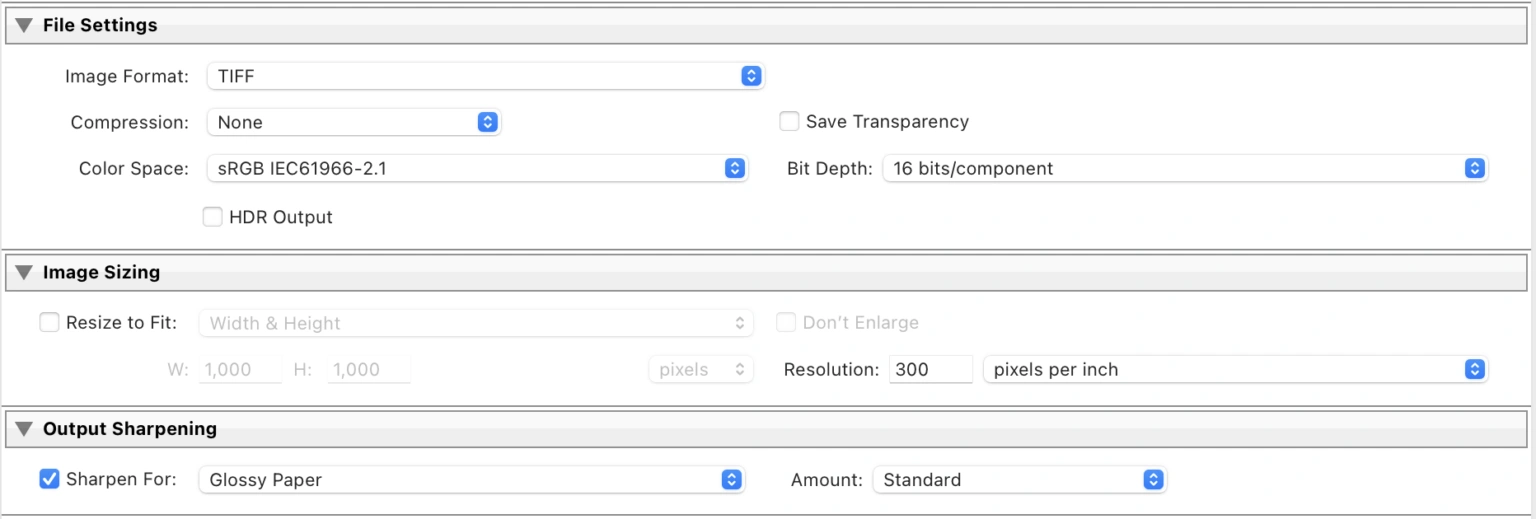
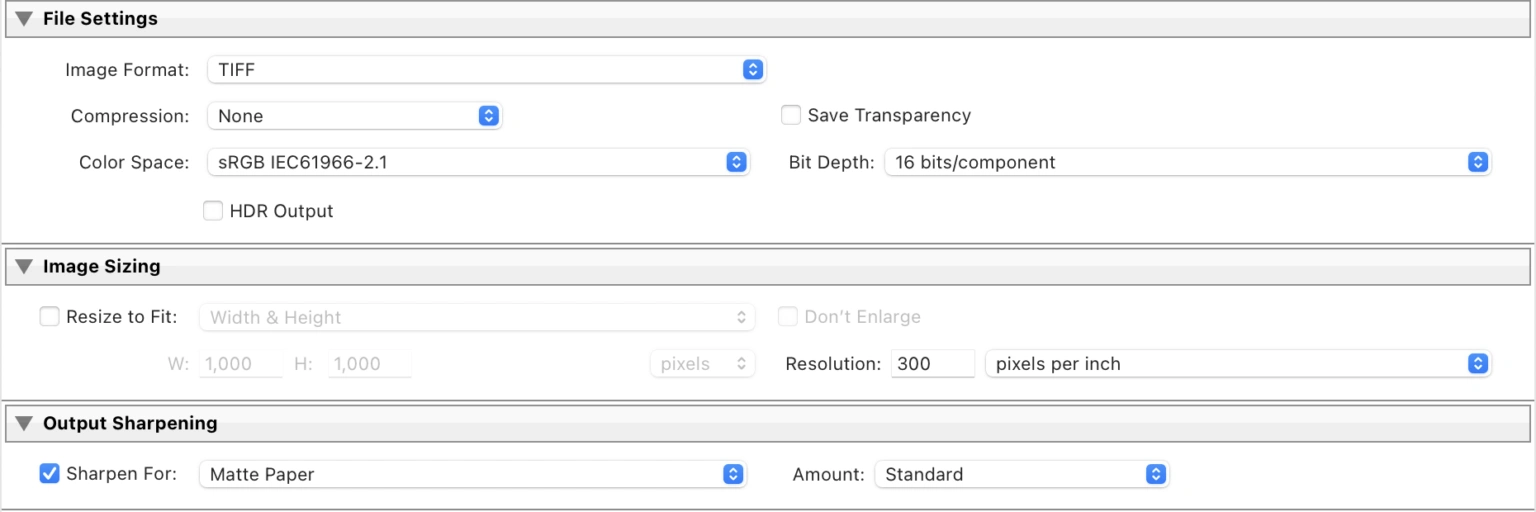
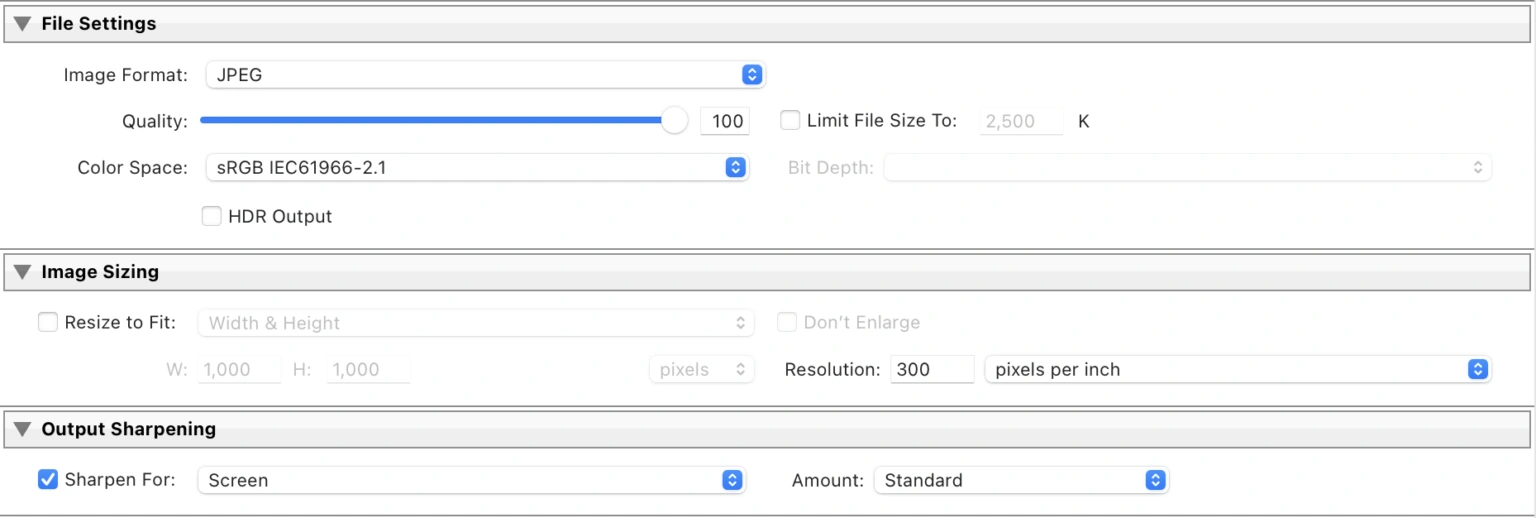
Export Settings
Here I will cover my suggested export settings – but please note, these are just my suggested settings that I find work best for me. You may find that you need to tweak these settings for your own use case, especially regarding the Output Sharpening, for example if you plan to sharpen in Photoshop, you may want to remove the Output Sharpening on the Print export settings. Furthermore, you will notice that I have kept the ‘Color Space’ as sRGB for all of these settings – typically I will also use other colour spaces such as ProPhoto RGB or Adobe RGB but the reasons for this are outside the scope of this blog.
To make things even easier for you, I’ve also included my Lightroom export presets that you can load up into your Lightroom using the following steps:
– Go to export an image
– In the Export pop up window, right click on ‘User Presets’ in the left hand Preset pane
– Choose ‘Import’ and add in the preset templates that you can download below
Download my Lightroom Export templates here:
Alternatively, here are the settings for you to manually copy over or replicate…
COAP Online
Archive
Print – Glossy
Print – Matte
Full Res JPG
Summary
So, that’s image file formats in an aviation nut shell! Hope you found that useful and that it provides you with a bit of guidance next time you hit ‘Export…’! Questions? Comments? Let me know below!
Until next time –
See you in The Merge…
Did you know our blogs are written exclusively by our members? We'd love for you to come and experience what COAP Online is all about!
Not yet a member?
Enjoy a free 30-day trial!
COAP Online membership brings 100s of aviation photographers from around the world together in a friendly, helpful and inspirational community. You'll enjoy monthly challenges, competitions, livestreams, blogs, exclusive discounts, meet-ups and more!
Get a free tutorial to your inbox every week!
Subscribe to our mailing list to receive a fantastic aviation photography tutorial to your inbox every Tuesday!
We hate spam as much as you. We will never sell your information, for any reason.