Setting up your NAS | Storing Your Photos Part 3
Apr 11, 2025
By Wayne Kenward
Accounts, Mobile Apps and Desktop Apps
Synology Account - https://account.synology.com/ Set up an account, you will need this to register you NAS and manage support tickets and subscription or licences. Also, the NAS and some services need this to work.
Synology Active Insights – https://insight.synology.com/ Mobile app and website to monitor your NAS, recommend.
Mobile Apps I recommend the following mobile apps:
- Drive Remote access to you NAS from your mobile.
- Secure SignIn Provides multifactor authentication push and 2FA codes
- DS Finder Mobile management of you NAS
- Active Insights Monitor and alerts for you NAS
Desktop Apps
- Assistant Find your NAS and connect to its shared folders
- Drive Client Works with Drive Server to sync to your PC, MAC or laptop
All apps can be found at:
https://www.synology.com/en-us/support/download
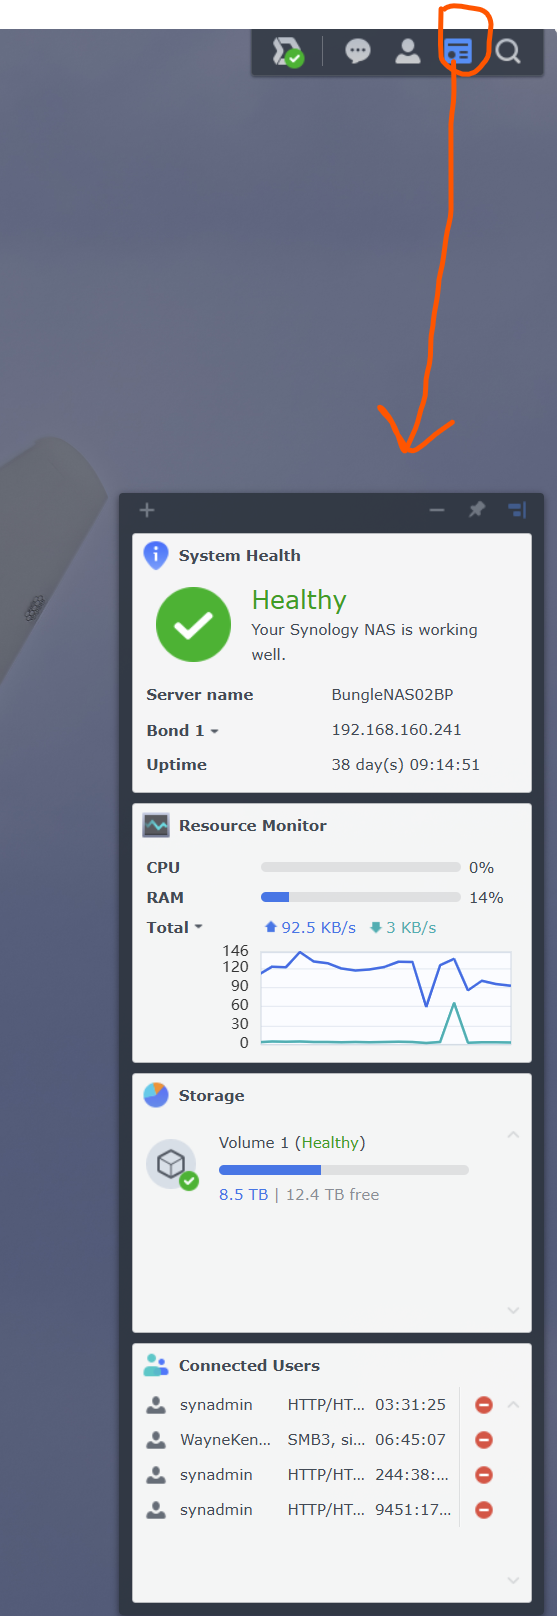
The Synology Desktop
Just like you Windows or MAC device, your Synology NAS has a desktop, that you can customise. This will help you navigate before proceeding with the sections below.
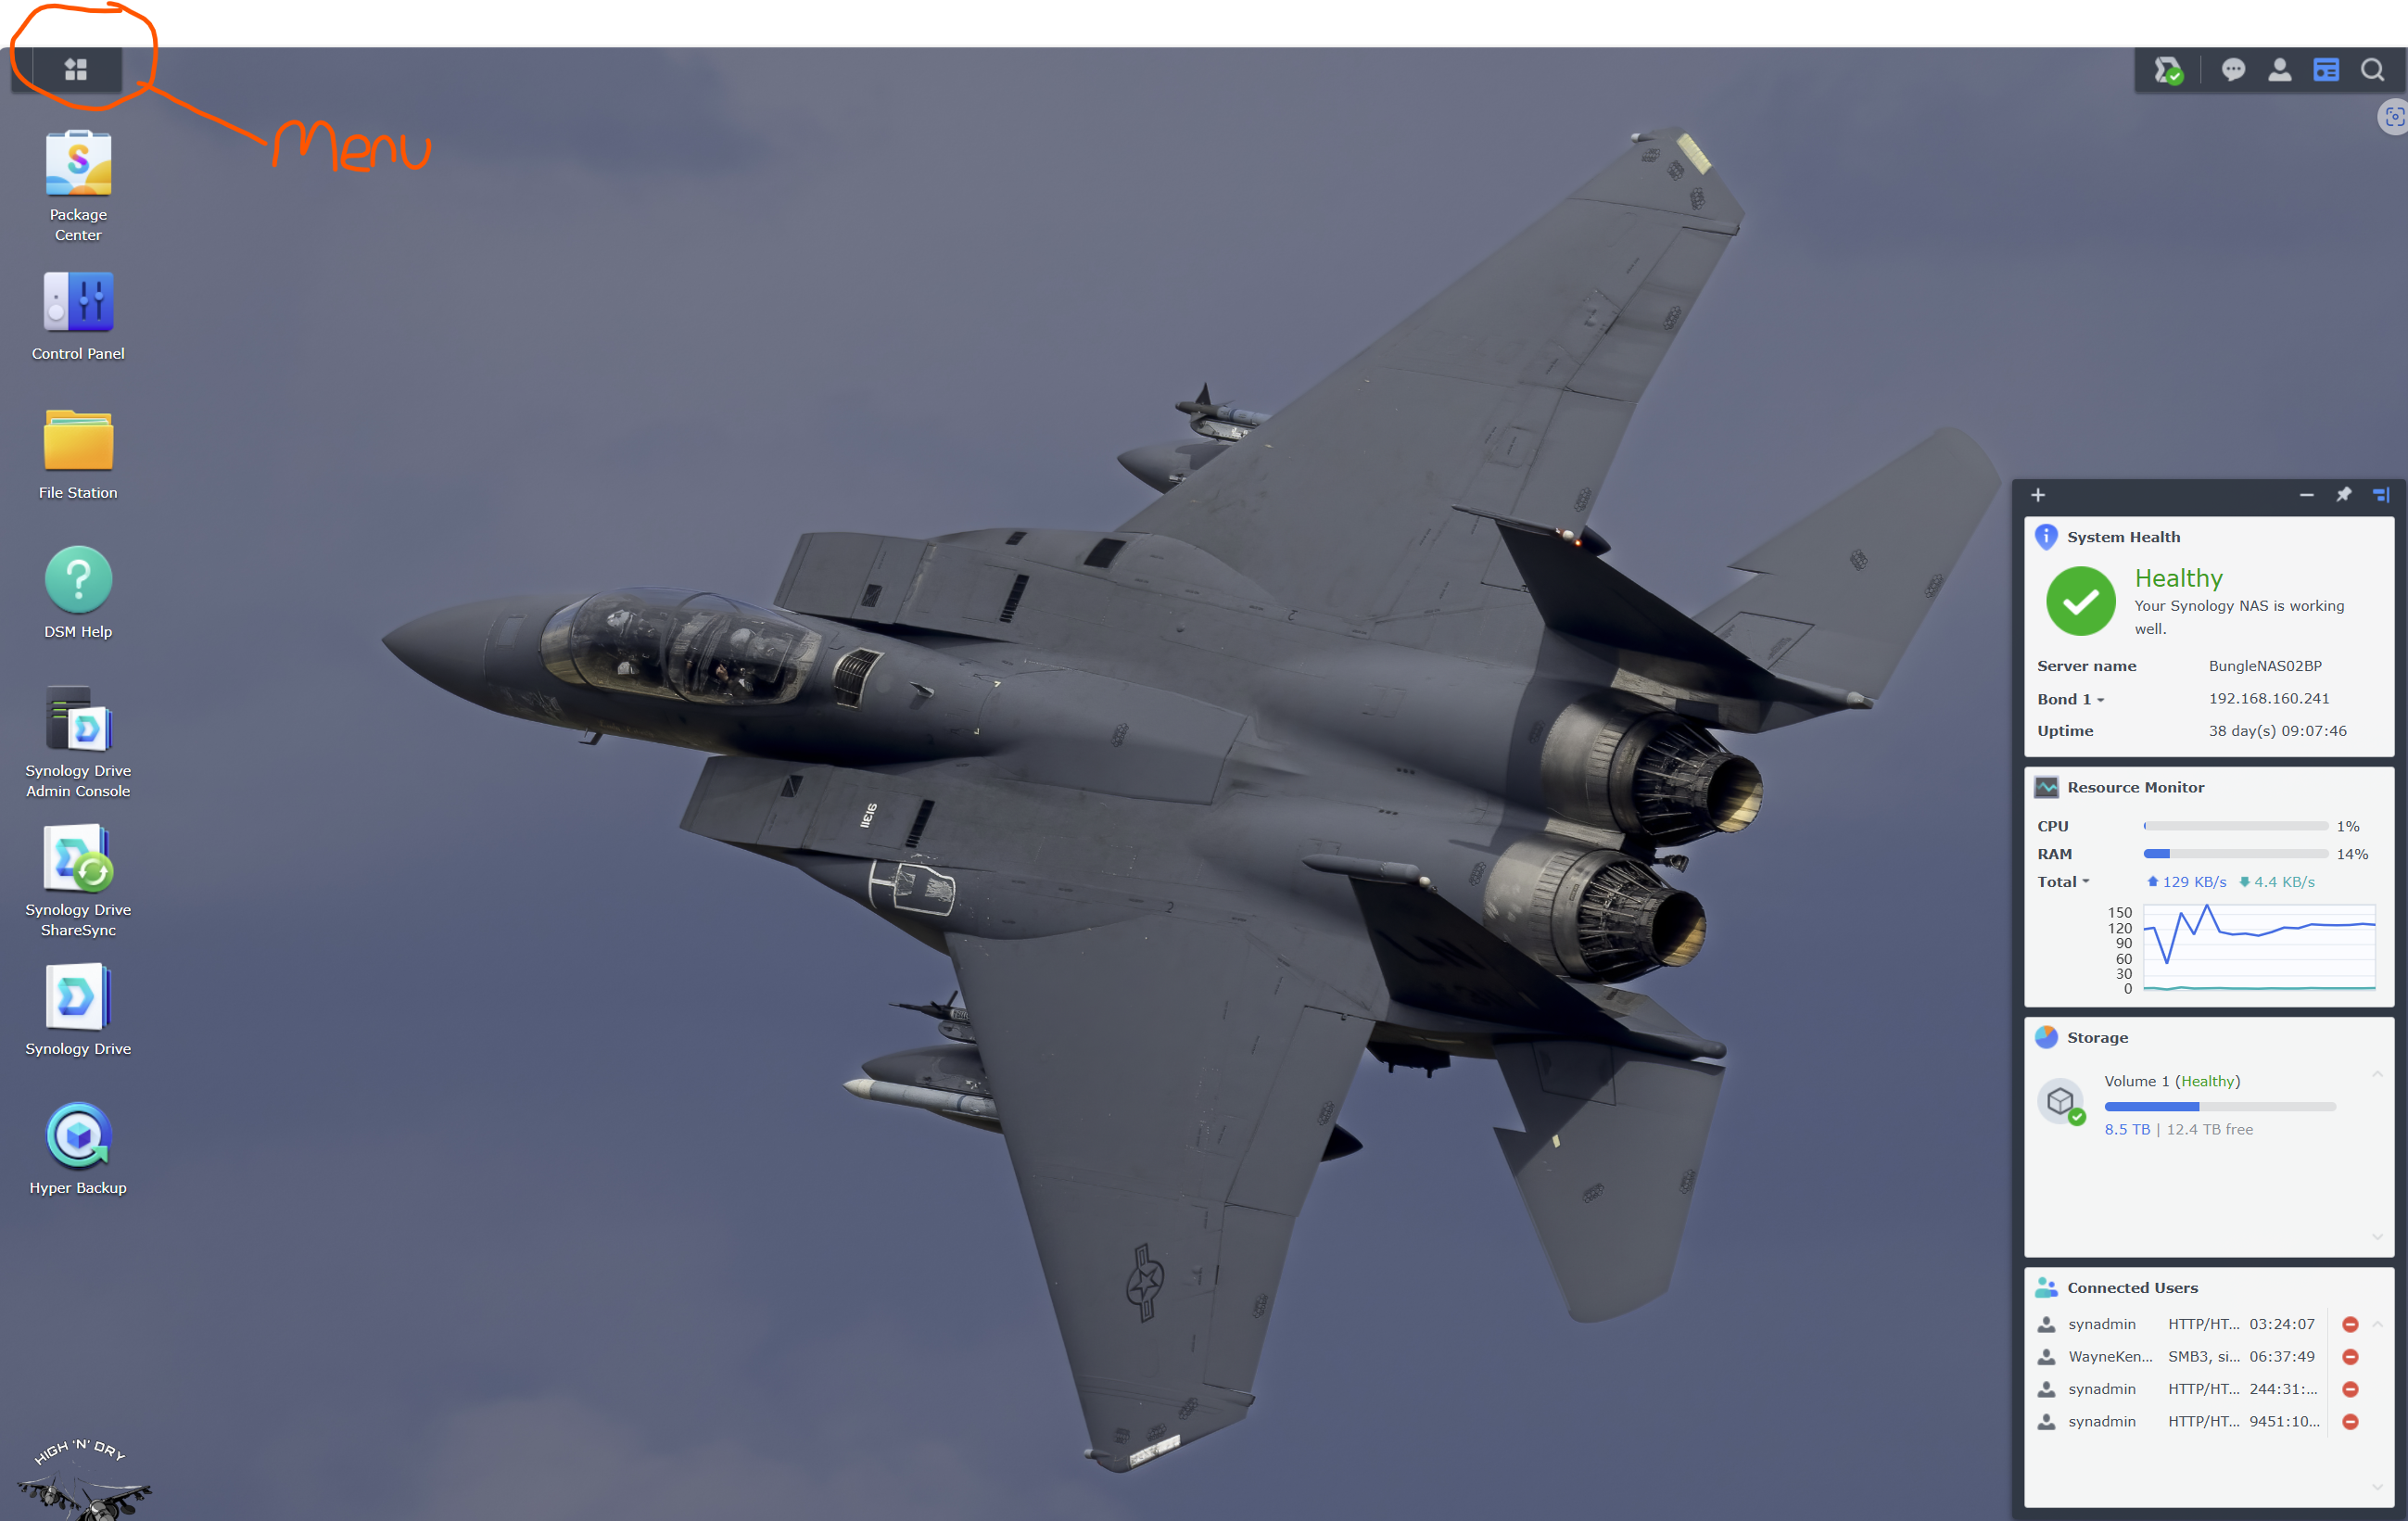
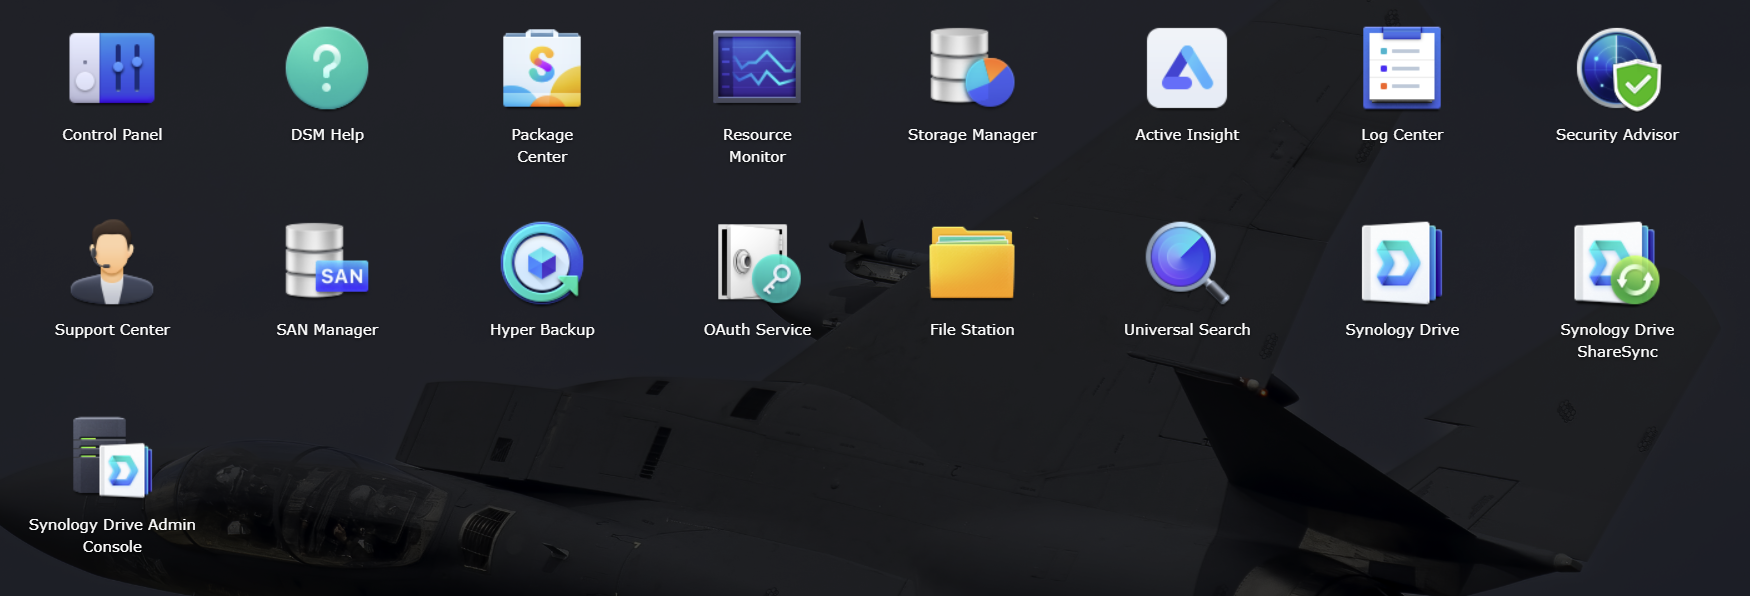
Menu
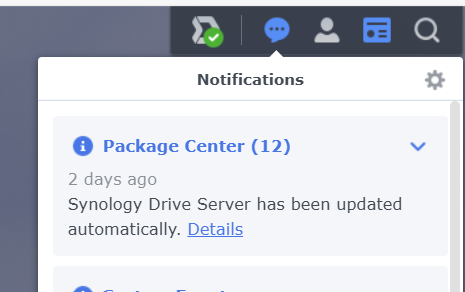
Notifications
User Menu

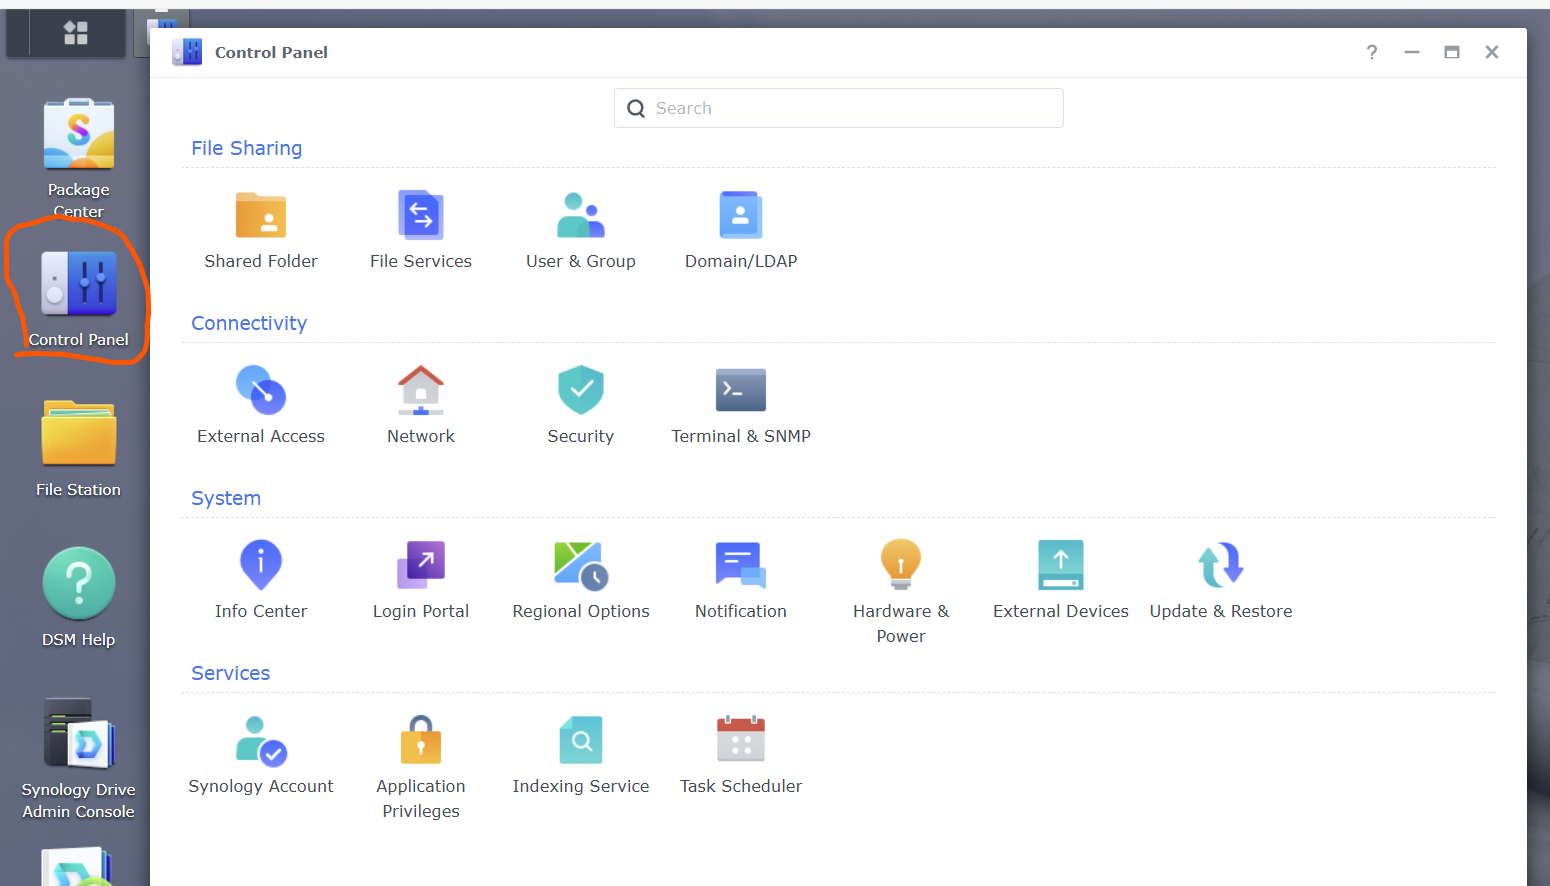
Control Panel – Most settings
Package Center – Install, update and manage applications
Widgets
NAS Setup
Refer to the “Preferred Connection Method” section of the blog Blog: Image Storage Guide | COAP Online. This explains how to connect the physical network side. Basically, you want the NAS and the system you are using to edit your photos to be on the same wired network. Wireless will work, but if Lightroom is trying to access files on the NAS, it will be slower than on a wired network connection. If you have the latest WiFi 7 access points and a WiFi 7 PC, MAC or laptop and have a good WiFi signal, it may be OK.
Once you have it physically connected, you can begin the setup. I won’t do a step by step setup guide as this will vary depending on the model and this is covered very well by Synology in their guides and on YouTube. Google “Synology XXXXX Setup Guide” where XXXX is the model, EG “Synology DS1522+ setup guide” will take you to Synology NAS DS1522+ Hardware Installation Guide and a host of YouTube videos.
They really aren’t difficult to set up, but here are some key points which will help.
Initial Setup
- Once you NAS is connected to your network, with hard drives installed and powered on, go to http://find.synology.com this will search your network for your NAS and guide you through the setup.
- When prompted to “Create your administrator account” I’d recommend the following:
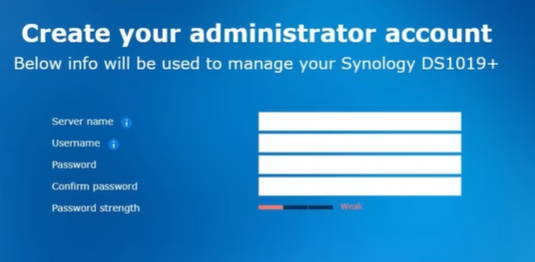
Server Name: Pick a name that doesn’t give a hacker tips to what it is. EG SpitfireStore01 would be good, DS423+NAS would be bad.
User Name: don’t use “admin” something like “SpitAdm” would be better.
Password: No Password123, please, try and make it easy for you to remember, but difficult to hack. Examples of good passwords are “Don’t Hack My N@S !n 1984”. A sentence is easier to remember and harder to hack, but always use upper and lower case letters, special characters and numbers. Better still use a password manager like “Keeper”, and randomly generate a password.
- Skip “Set up QuickConnect”, this will be covered later.
- When the intinal setup complates, you will be able to login to management interface with the username and password set previolsuy.
Further Steps
There are a few areas that you may need to configure: I suggest reviewing all the guides and YouTube videos in the section below. Here are a few recommendations -
- Storage Manager
- Create a Storage Pool and Data Volume (refer to guides and YouTube)
- Control Panel
- Synology Account
- Shared Folders – Configure for your files
- Security – Very important to keep your data safe
- Users – Configure users and access to folders (do not use your admin account)
- Network – Setting a static IP address and multiple ethernet ports
- Regional Options – Configure for you part of the world.
- Notifications – alerts
- Hardware and Power – a place to set a power schedule if you want to turn it on and off at set times
- Update and Restore – Keep your system up to date and backup your configuration
- External Excess – Quick Connect for remote access into your NAS or to for syncing your NAS to another NAS or PC/laptop/MAC.
- Synology Drive Server
- Drive Admin Console Set file versioning and review remote clients
- ShareSync Sync folders
- Hyper Backup Backup to the cloud
Storage Manager
Storage Manager does what it says on the tin, it manages everything to do with storage.
Overview
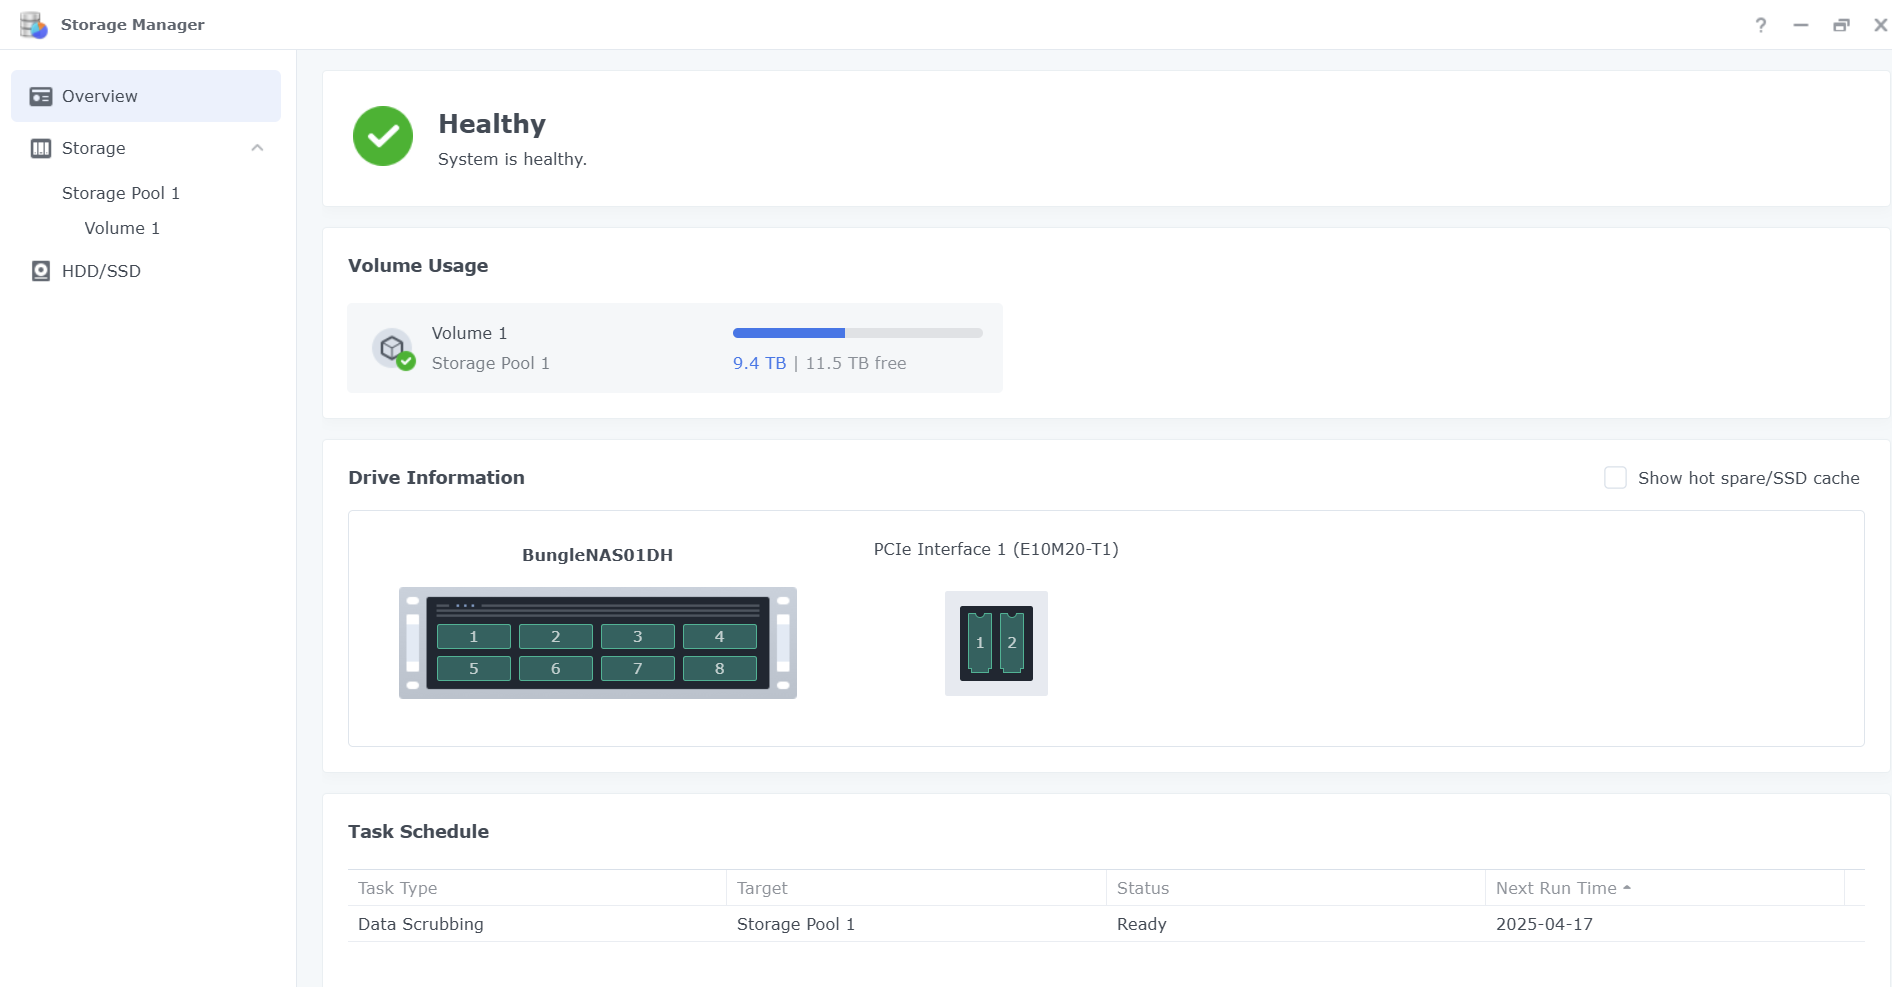
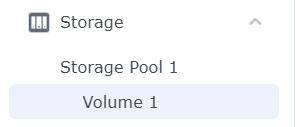
Storage - Has two sections.
- Storage Pools How the drives are configured
- Volumes How the storage in the pools is configure
I believe in keeping things as simple as possible, and recommend for photographyall drives are added into a single SHR or SHR-2 pool and all data in that pool is allocated to the single volume. This is also the default and should look like this:
Storage Pool
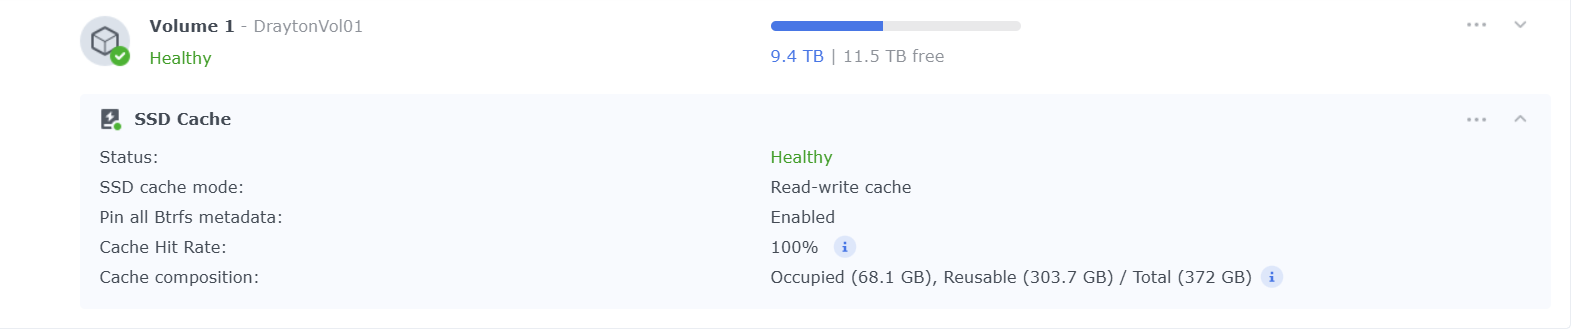
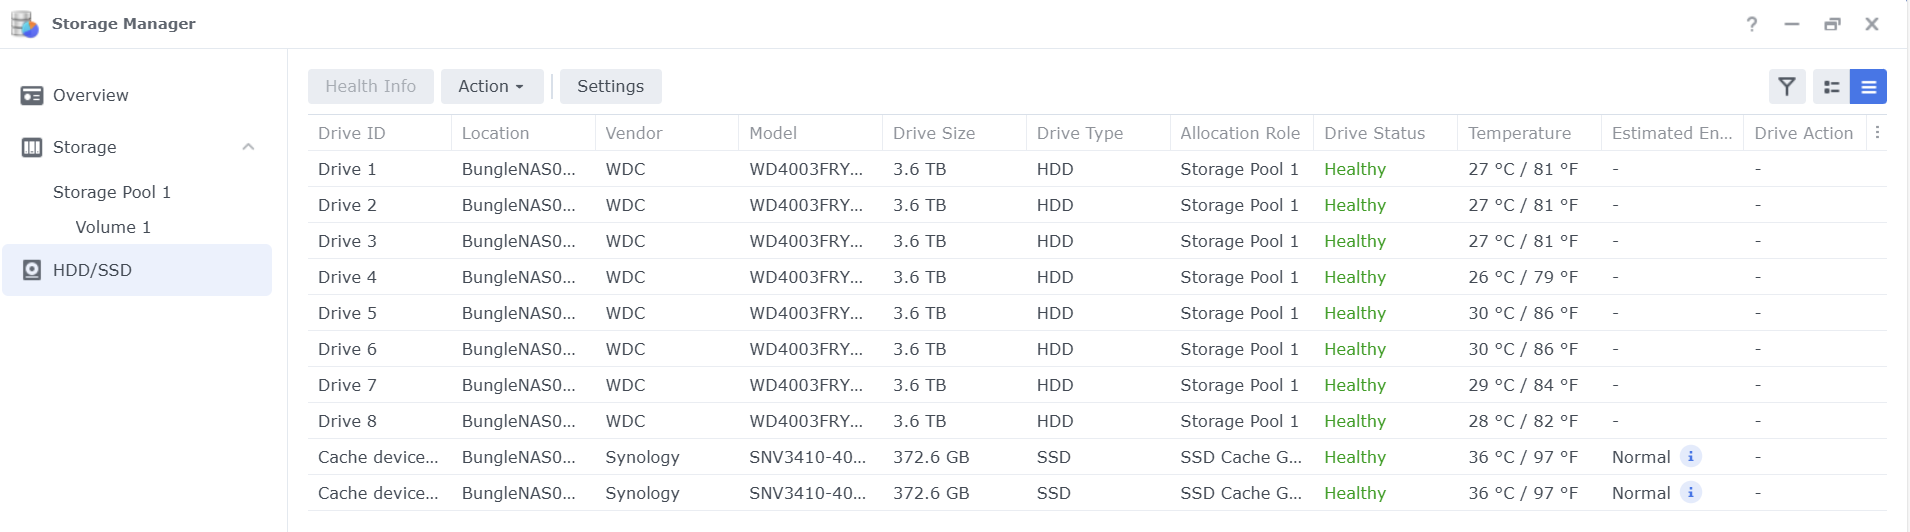
Below is my storage pool “Storage Pool 1” details all 8 WD 4TB drives (3.6TB is the usable space on each 4Tb drive) and their status. It also shows the 2 M.2 cache SSDs.
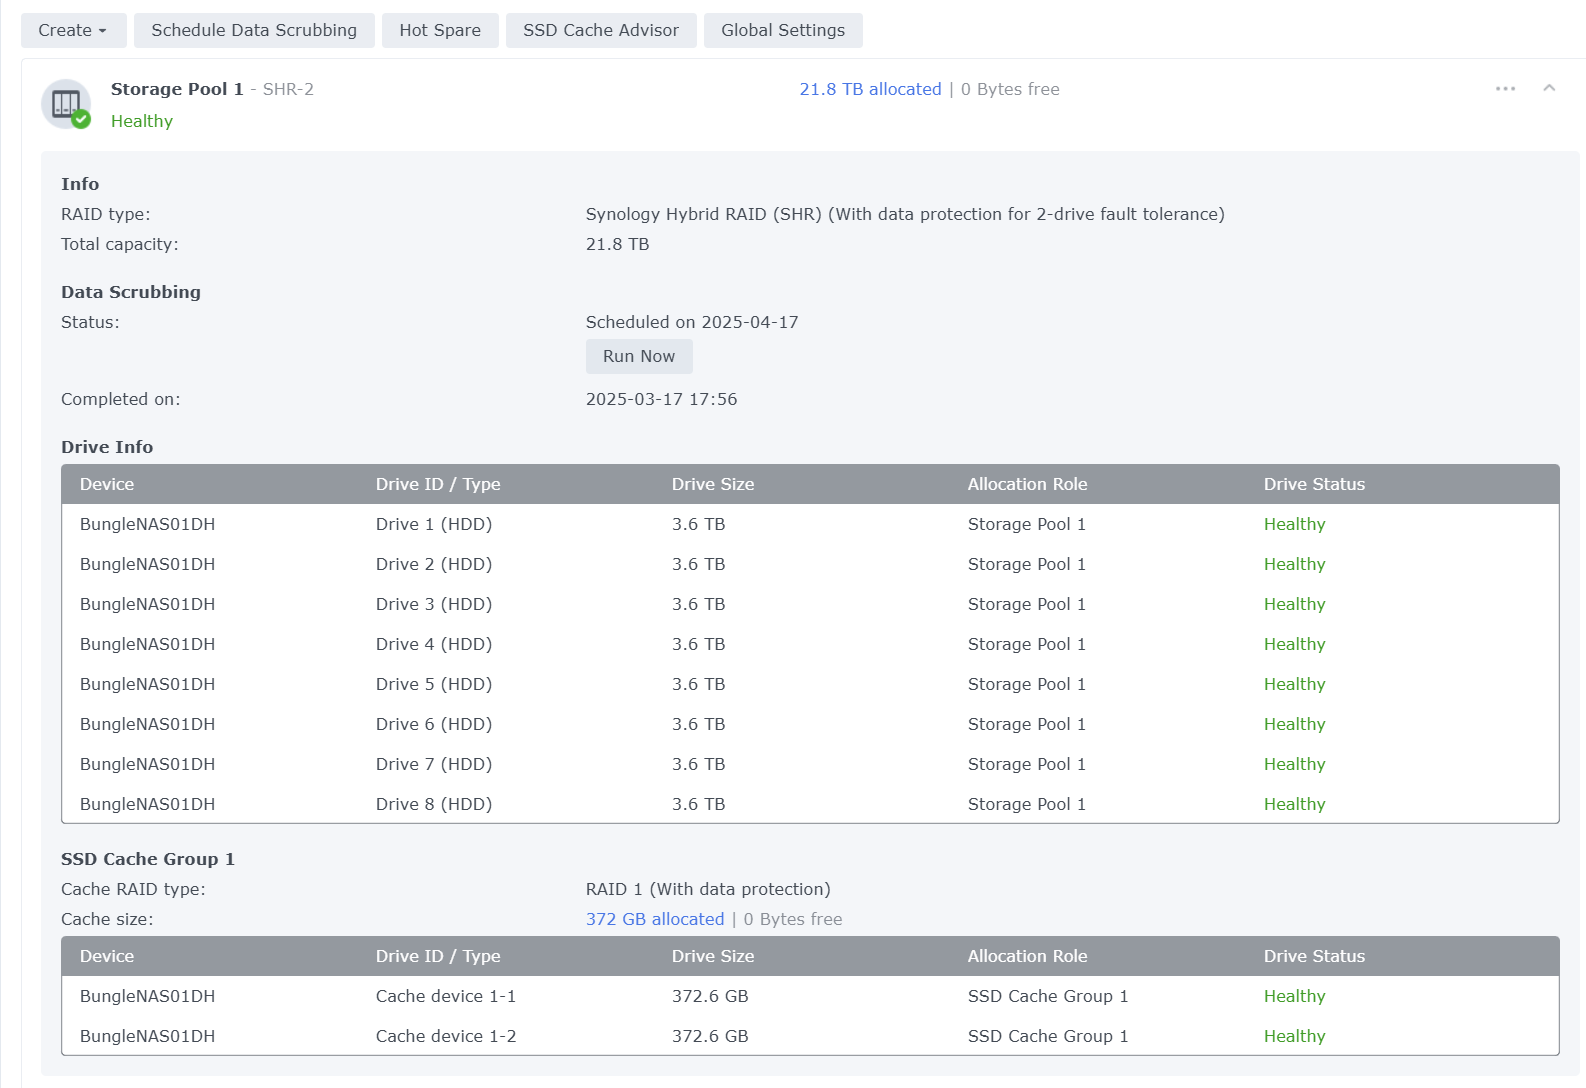
Volume
Details the status including space used and free space.
HDD/SSD
Shows the status and model of all drives fitted in your NAS.
Setup
The Synology Storage Manager wizard guides users through creating storage pools and volumes, offering a centralised interface for managing storage, monitoring usage, checking drive health, and using advanced features like hot spare drives and SSD cache.
Here's a breakdown of how the Storage Manager wizard works and its key functionalities:
- Accessing the Storage Manager:
- Go to the DSM (DiskStation Manager) Main Menu and select "Storage Manager".
- If it's your first time using Storage Manager, a first-time creation wizard will appear, guiding you through creating a storage pool and volume.
- Creating a Storage Pool:
- Choose RAID Type: Select a RAID type (e.g., RAID 5, RAID 10) to protect your storage pool, considering data protection and features.
- Select Drives: Choose the drives you want to use for the storage pool.
- Follow the Wizard: Follow the steps in the wizard to complete the setup.
- Key Features of Storage Manager:
- Storage Pool Management:
- Create, manage, and expand storage pools.
- Configure RAID types and other storage settings.
- Volume Management:
- Create volumes on storage pools.
- Manage shared folders and packages on volumes.
- Drive Monitoring:
- Monitor the health of installed drives.
- Check drive status and take actions when needed.
- Advanced Features:
- Use hot spare drives for redundancy.
- Configure SSD TRIM and SSD cache for performance.
- Storage Capacity Allocation:
- Allocate storage capacity to different users and applications.
- Monitoring Storage Usage:
- Track overall storage usage of your Synology NAS.
- Drive Compatibility:
- Ensure system stability by using drives listed on the Synology Products Compatibility List.
KEY POINT – Remember SHR or SHR-2

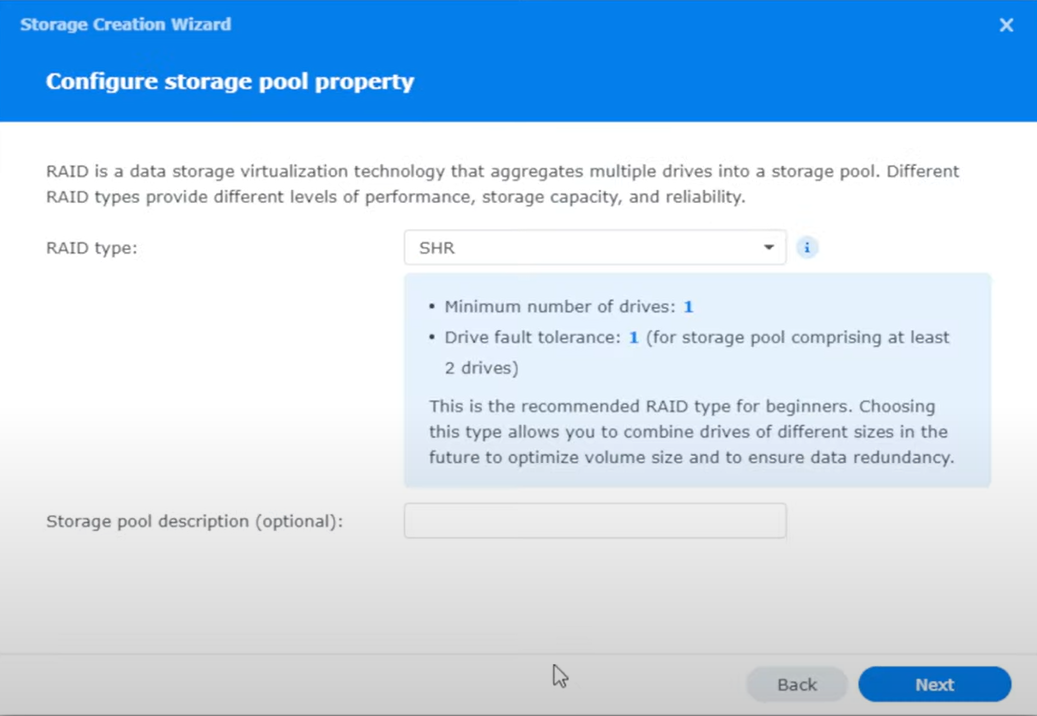
SHR or SHR-2 recommended
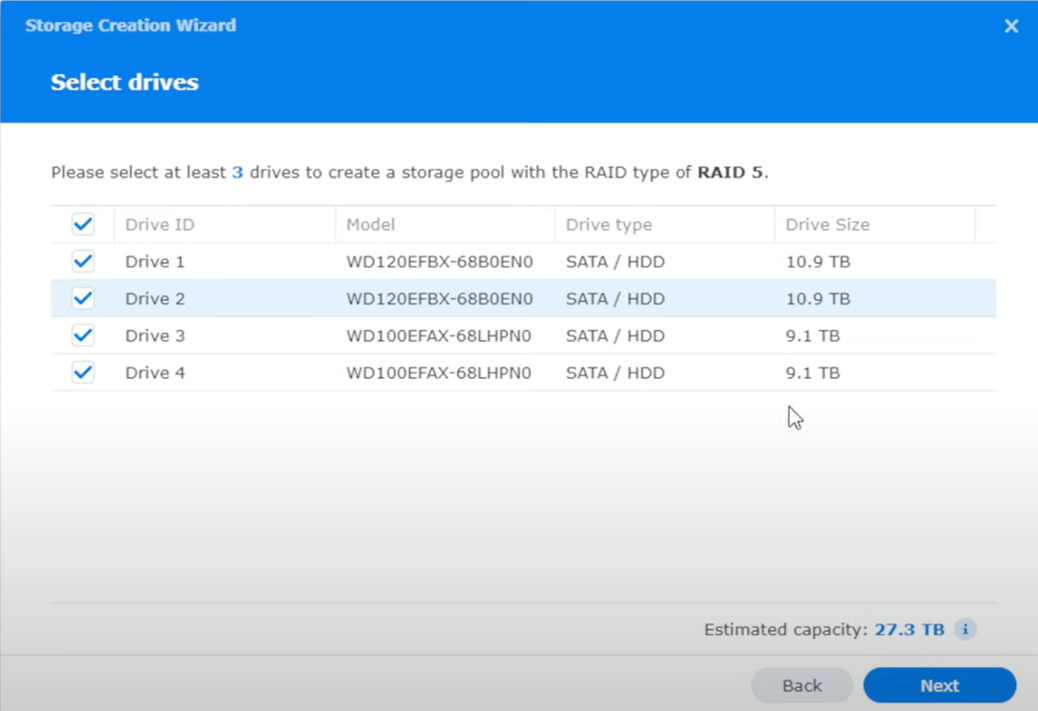
Select all drives
Click next until you get to
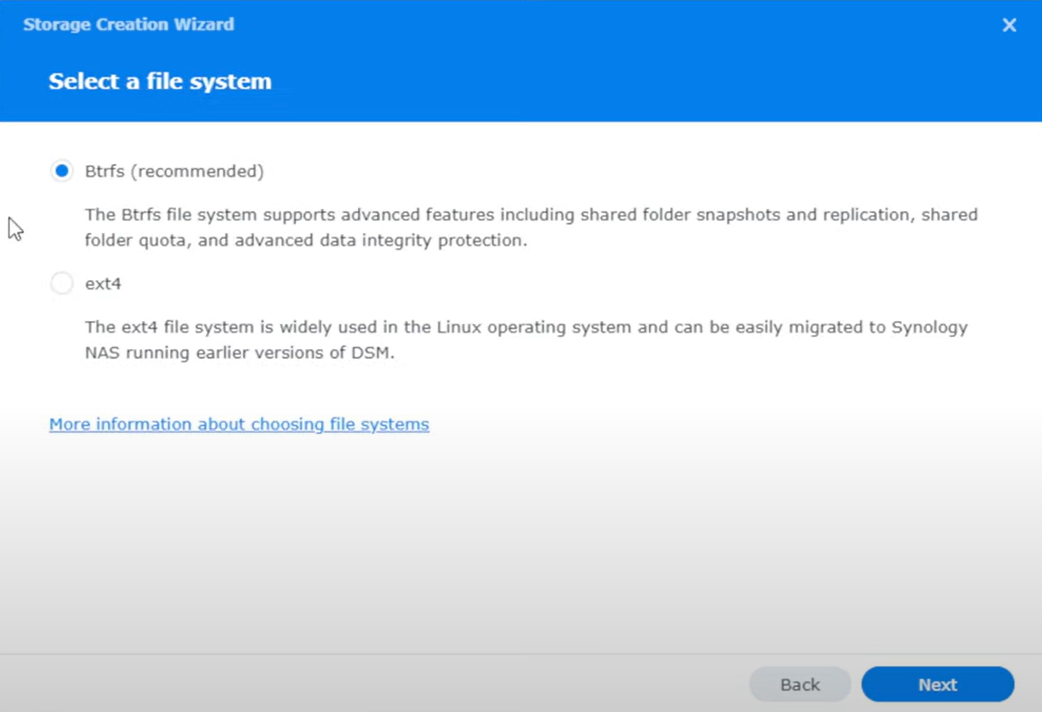
Leave as Btrfs unless you use Linux
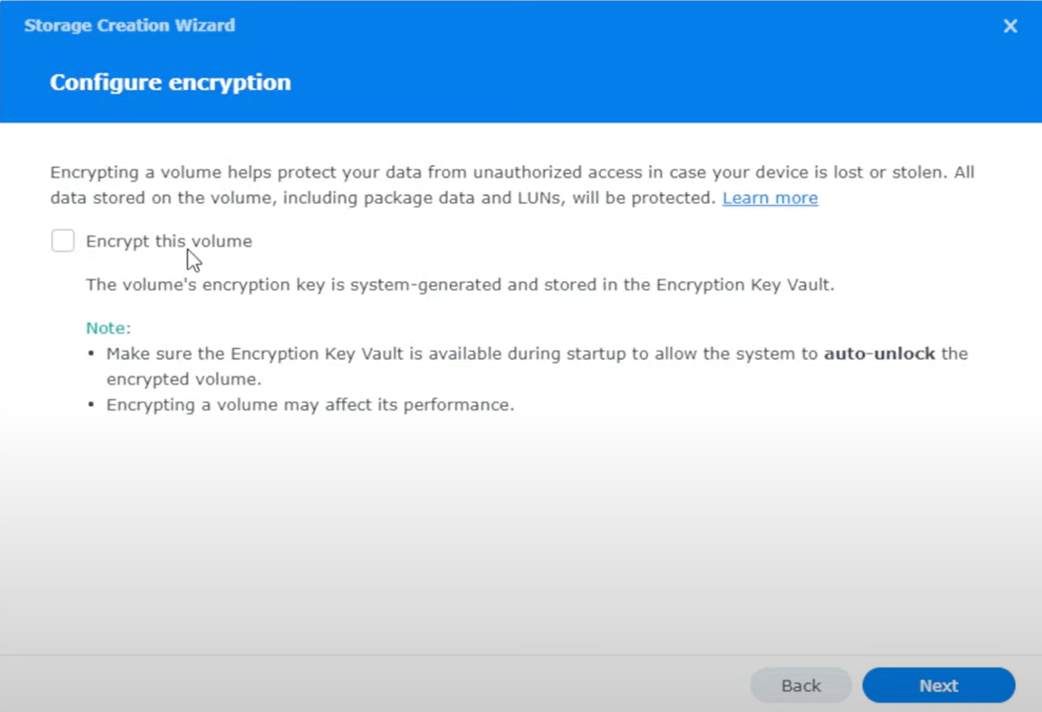
This is a personal choice. If someone steals your NAS, it makes it very hard for them access your data. It may slow things down slightly if enabled. If you are only storing photos, then I’d say leave it off, if you have highly confidential data stored, then yes, encrypt it.
Storage Manager will now go off and create your storage pool and volume, it’s that simple.
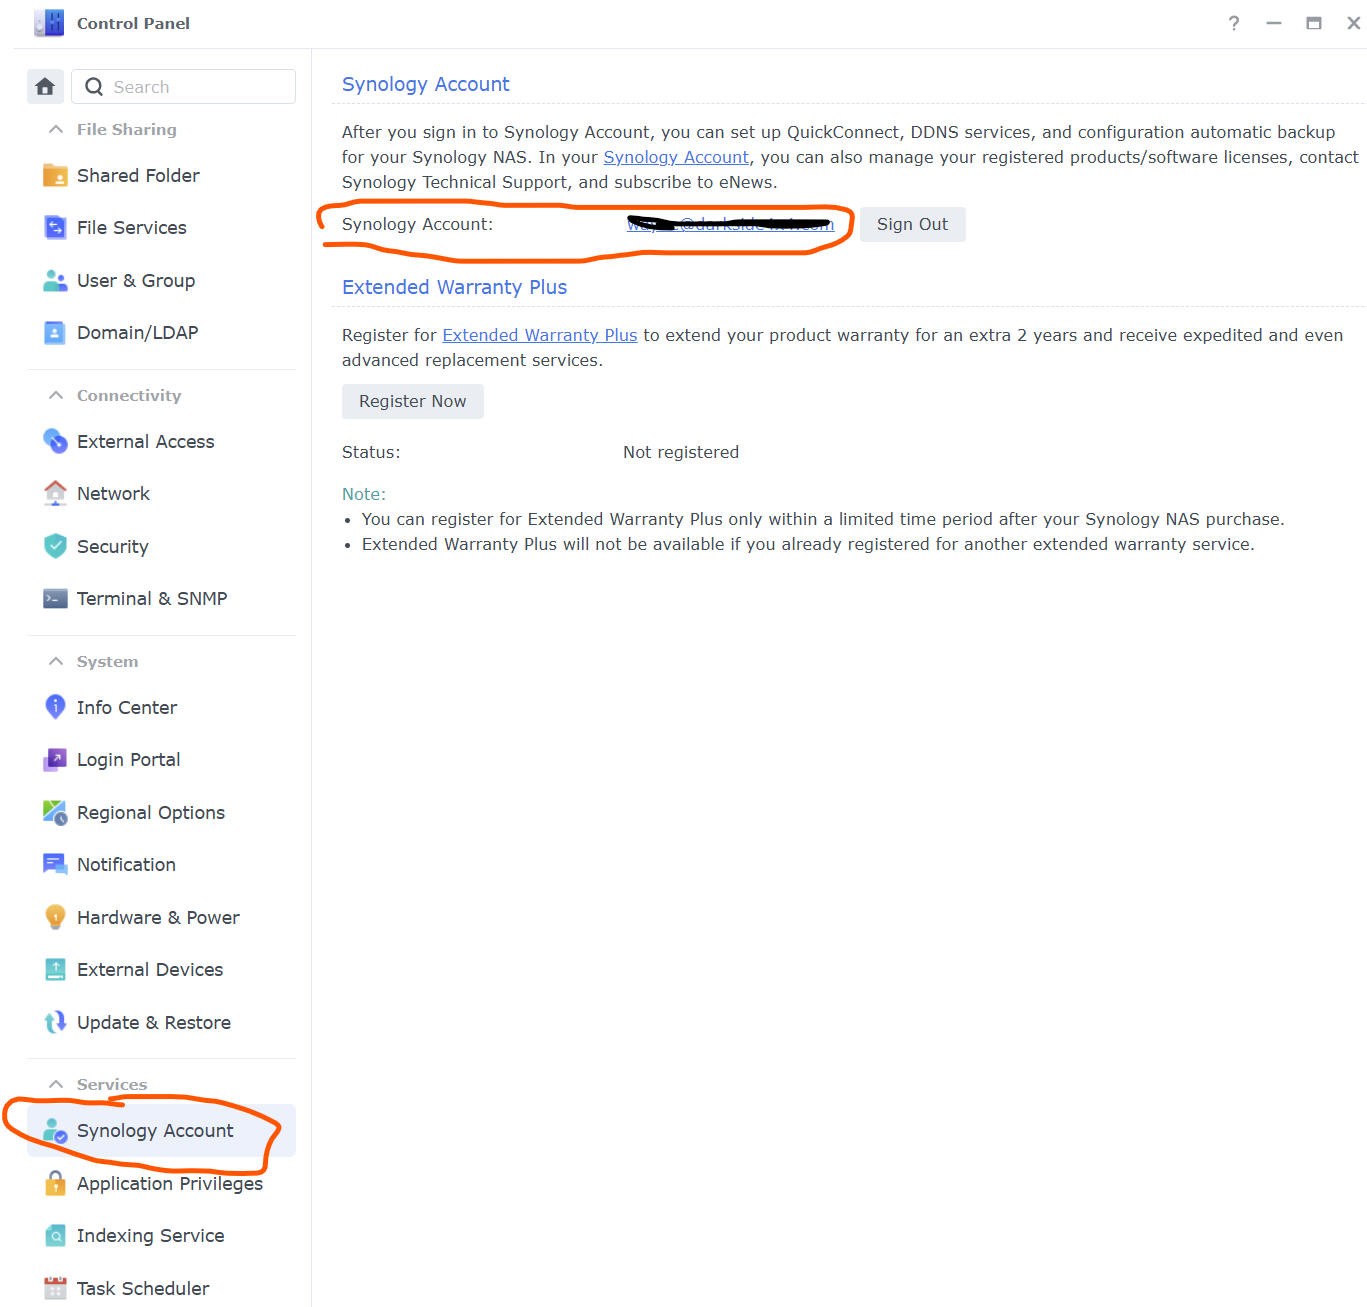
Synology Account
Use you Synology account details here, to enable you NAS to communicate with your account
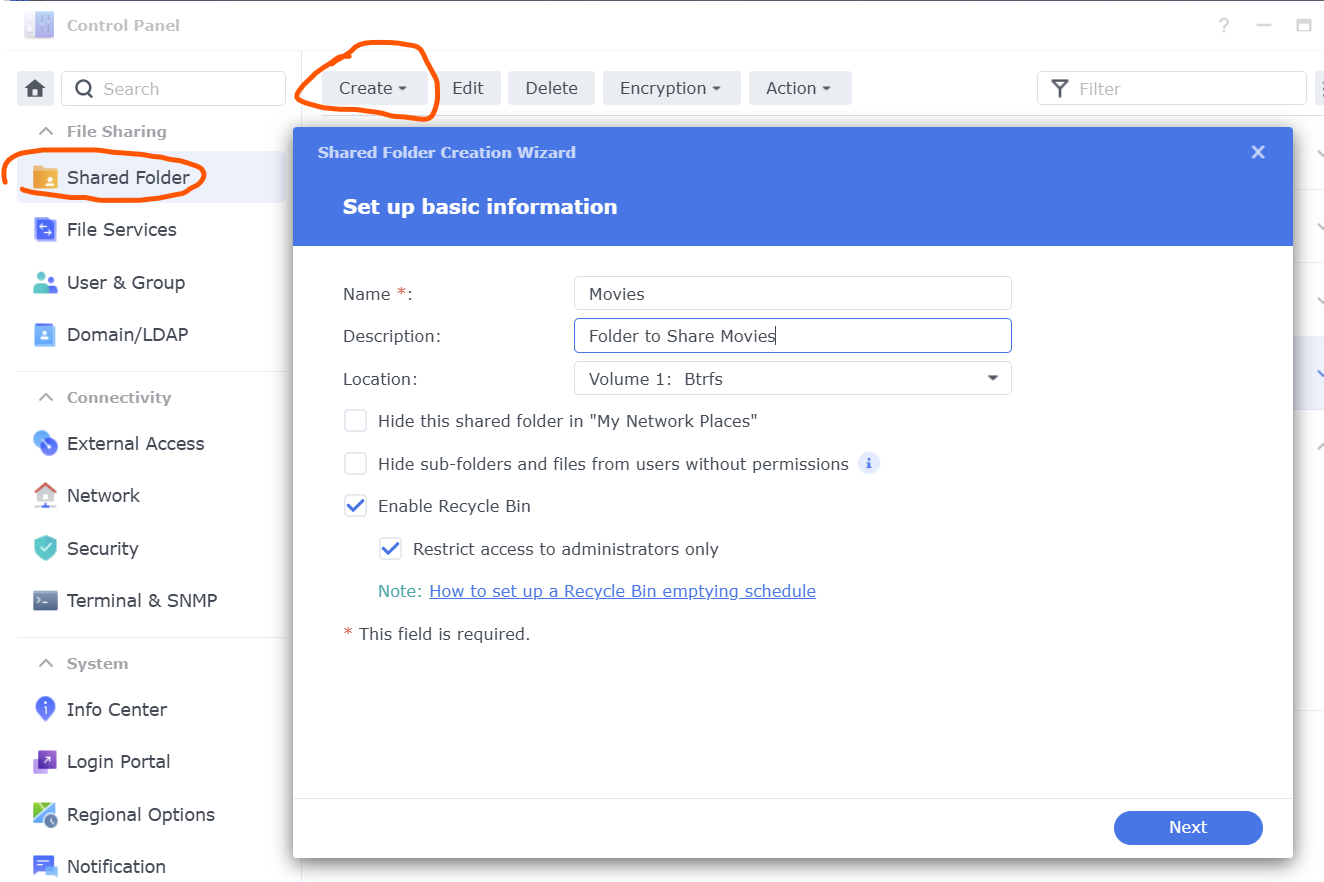
Shared Folders
Shared folders are locations you can store files and folders in, set permissions for users and groups of users (No Access, Read Write Access, Read Access only), set file versioning (saving old versions of a file), and they share out via your network.
It may help if I explain my Shared Folders.
- Household Anything do to with the house, both my partner and I have read write access and we access it via H drive on Windows.
- Photography Photos, both my partner and I have read write access and we access it via a P drive on Windows.
- Media Music, I have read write access, my partner only has read, so she can only play music, we access it via M drive on Windows.
- Kenward My personal data, only I have access
- Hartshorne My partners personal data, only she has access.
Think about your requirements, if you wanted to use your NAS for photos, music and general file storage, the following would be a good example.
Share Folder Drive letter and usage File Version to Keep
- Music M Drive, for music storage 2 versions
- Photos P Drive, for photo storage 4 versions
- Store S Drive, for a general file store 16 versions
To create folders.
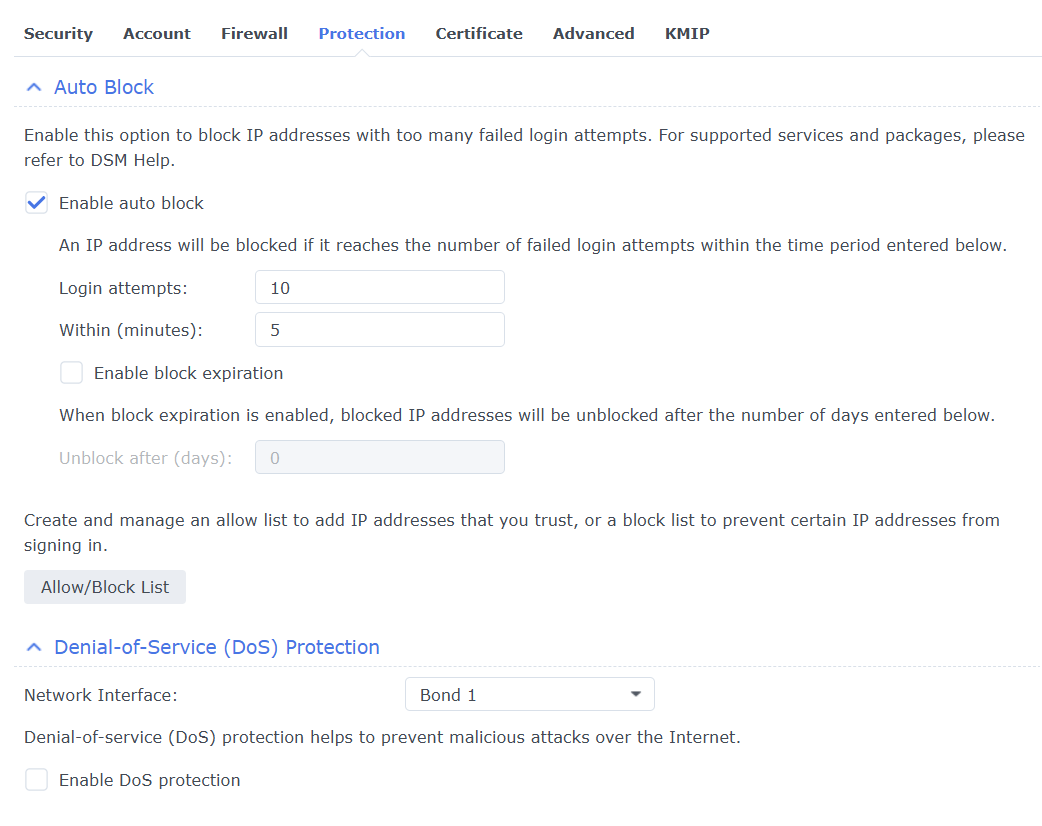
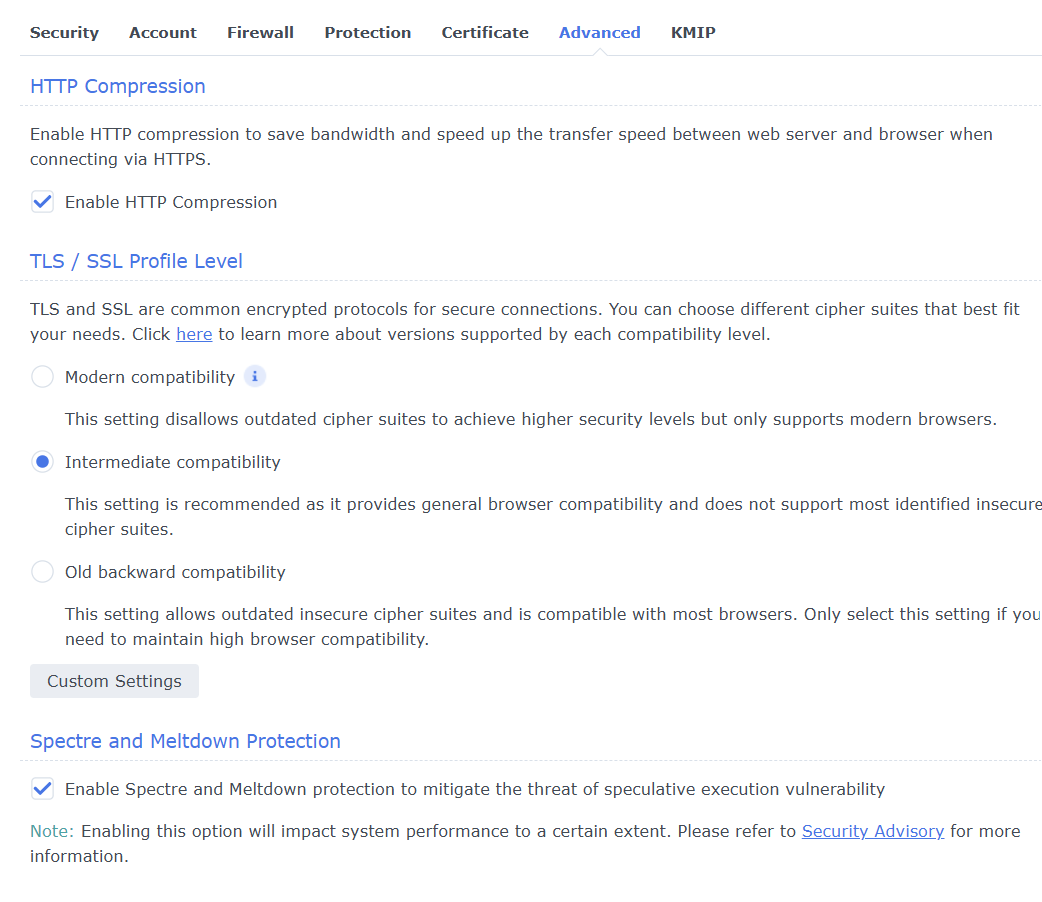
Security
Security is key as your NAS will connect to the internet, even if you don’t setup QuickConnect. These are my recommend settings. But you may want to change some to fit in with your own network and security requirements. Personally, I’m not using the Firewall and DoS protection as I have a high end Firewall, but if you have a standard ISP router, you may want to enable these.
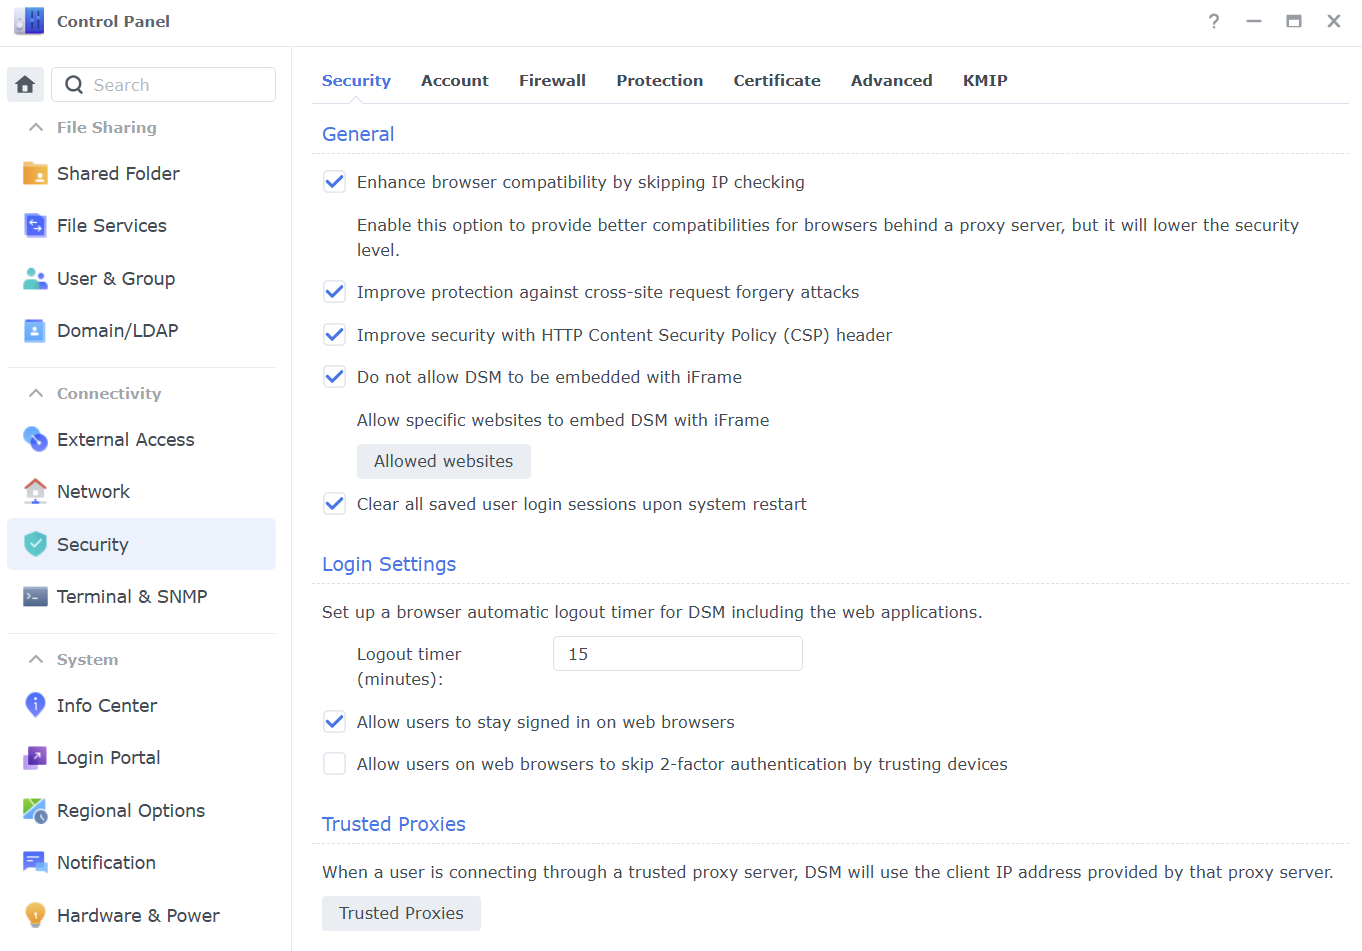
2-Factor Authentication is key, not just for your NAS, but all systems and web accounts, it’s why online banking and secure business systems have used it for years. It works great with the Synology Secure SignIn mobile app and also with things like Authy and Google Authenticator.
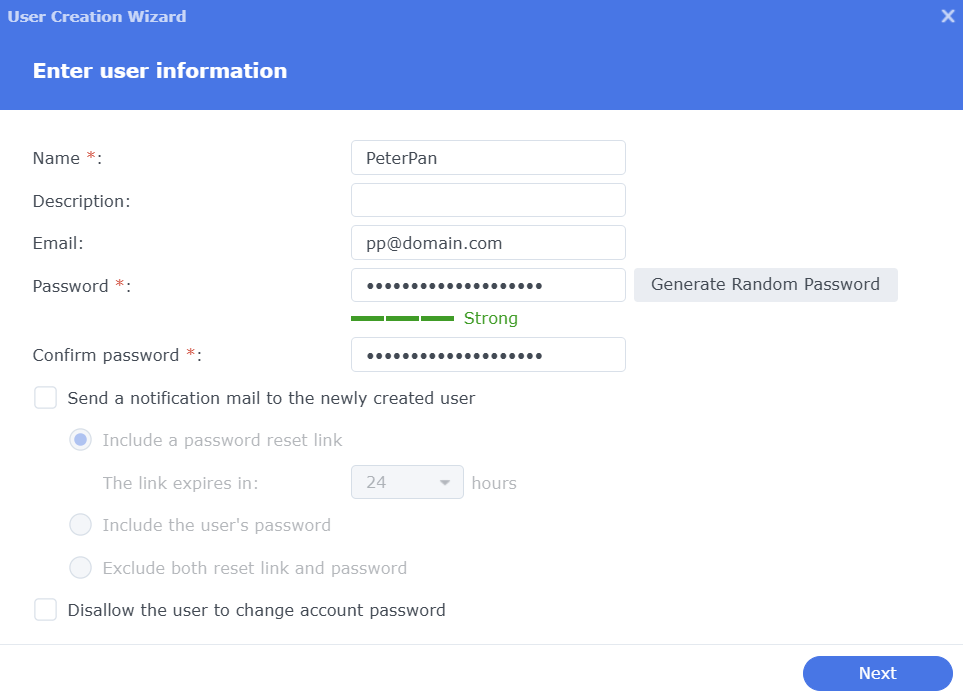
Users
Set up a user for yourself and anyone else that needs access to your NAS. You can restrict each user. I’d suggest the administrator user is only used to administer the NAS users without administrative permissions are set up. Also make sure the default accounts are disabled as these will be target by hackers, they are Admin and Guest.
To add users.

Fill in the user details
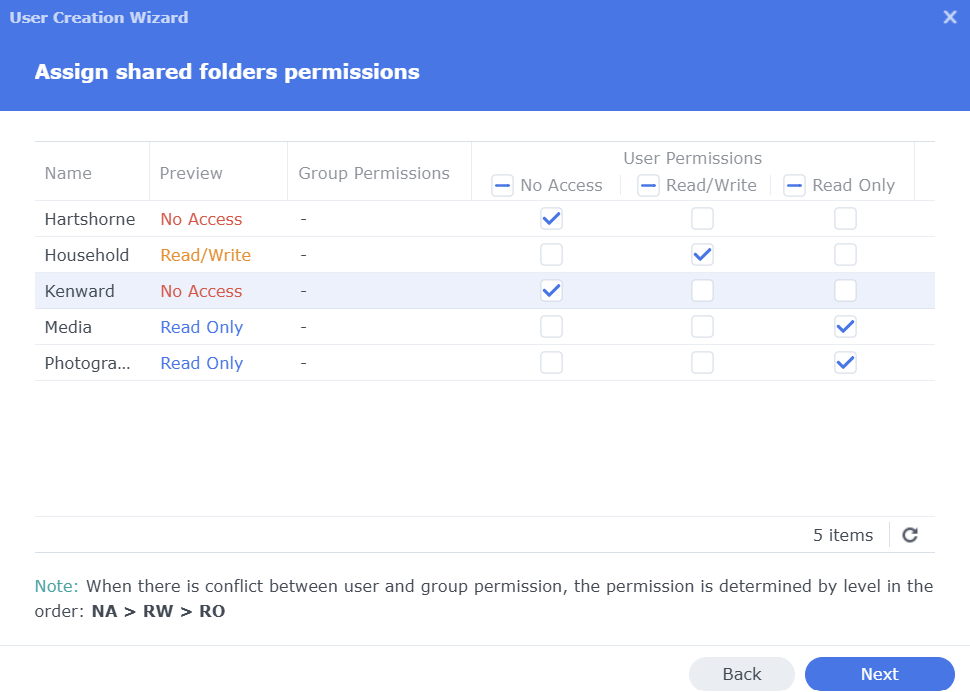
Select Groups
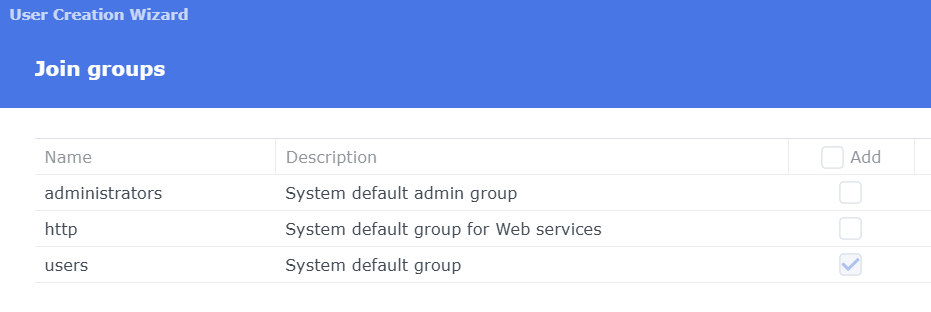
Decide what folders and privileges they can have. In the example below they would have:
Access to read and write, which include create new files and delete files on the Household shared folder.
Access to view photos in Photography and play music in Media, but no access to change, add or delete photos or music.
No access to Hartshorne or Kenward shared folders.
Network
By default, the Synology will pick up a Dynamic IP address from your network, normally your ISP router provides the DHCP service. This works for most things, like your TV, laptops, PC etc, but some items, like network printer and definitely NAS devices work better with a static IP address. If this bit blows your mind, ignore it, it will still work, but you may get issues if the ISP router is replaced or turned off for a while.
If your ISP router is doing DHCP, by default most will use every IP address in the range, giving you over 250 IP addresses. Most homes, even with all the IoT devices like CCTV, TVs, and smart devices don’t come anywhere close to 250 devices. The first step is to change the DHCP scope on your router (that will have scared a lot of people off reading any more on the Network section !).
Follow these steps to reconfigure your ISP router.
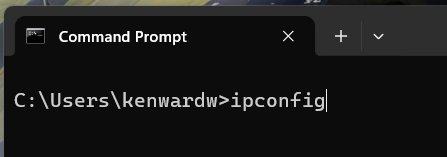
- Find the IP address of your ISP router, this will be the default gateway on any device connected to your network. On Windows, open a command prompt (type CMD in the search box) and then type in ipconfig
Look for  if using a cable or
  if using WiFi
The IP details will look like this.

You can see the default gateway is 192.168.160.1 and my laptop is 192.168.160.95
Open up a web browser, and type in the default gateway IP address in the address box (were you normally type in www.google.com), this should take you to the log in page for your router. Every router is different, I can’t help here, but will give you what you would need to make the change. I suggest speaking to your ISP to help you or using Google to see how to do this.
Look for DHCP, it is normally under networking.
Find the Range or Scope section, by default this will cover the complete range, excluding your router IP address.
Using the example above , where the router is using 192.168.160.1, the range/scope is likely to be
Start 192.168.160.2
End 192.168.160.254
Change the range/scope
Start 192.168.160.2
End 192.168.160.199
Remember to use your IP structure, the common ISP ranges 192.168.0.0, 192.168.1.1 and 192.168.254.0.
Restart all devices on your network, including TVs and Smart devices, in case any are using an IP address for 200-254.
Now go back to the Synology and select Network, Interfaces from the control panel.
My screenshot below will be different to yours; I have 4 x 1GB network ports configured together in Bond 1 (I’ll cover this) and a disconnected LAN 5 which is the optional 10Gbps network card.
If your NAS as 2 x 1Gbps network ports, it will have LAN1 and LAN2, if you have 4 ports, you will also see LAN3 and LAN4.
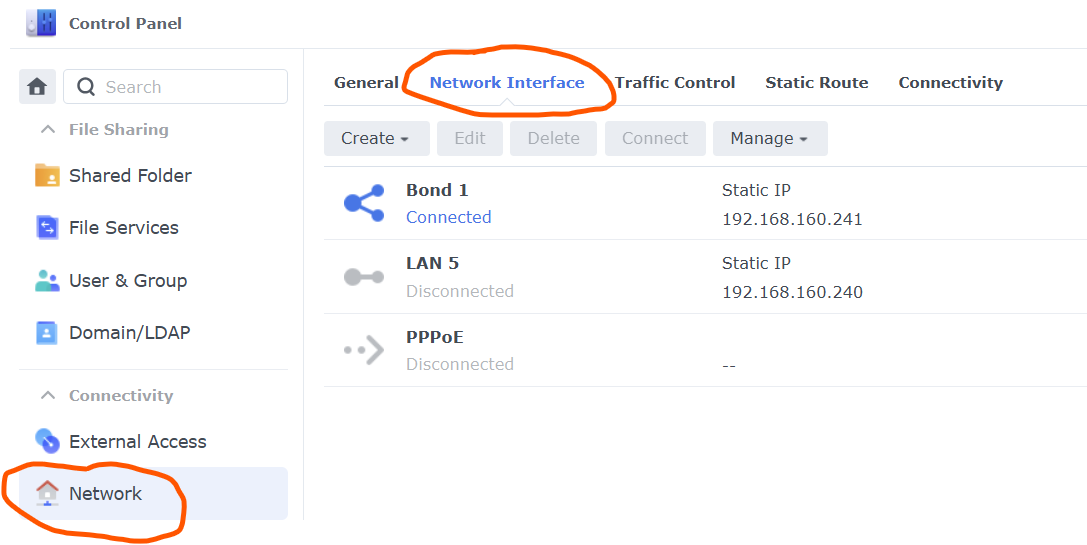
Disconnect all LAN cables apart from LAN1
Select LAN1 and the click on Edit.
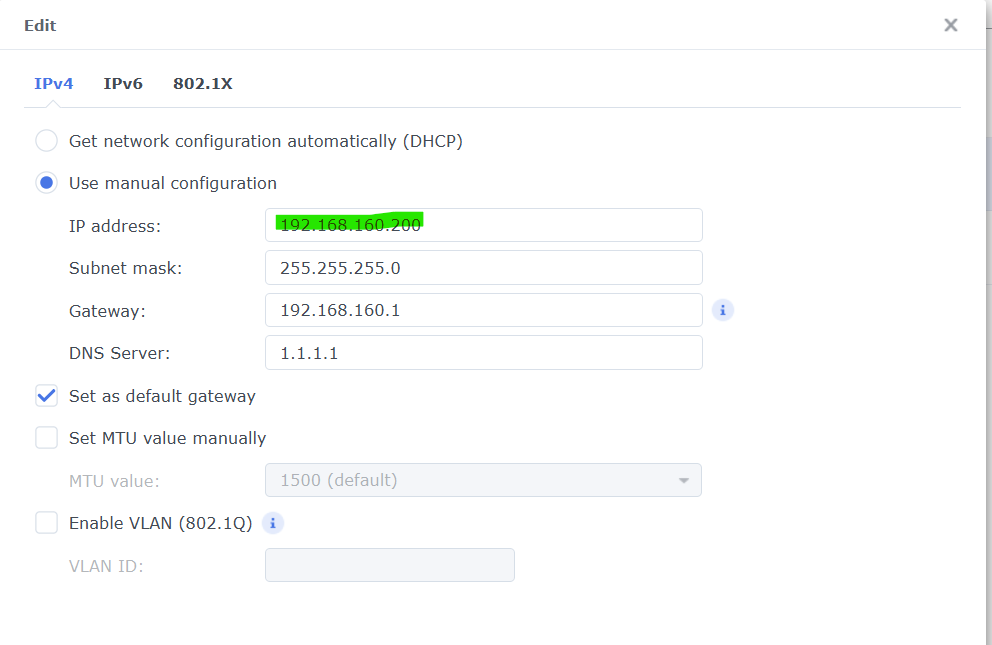
Set as per the instruction below using your IP range.
NOTE:
IP Address
If your router is:
192.168.0.1 or 192.1168.0.254 – Set the IP address highlight in green to 192.168.0.200
192.168.1.1 or 192.1168.1.254 – Set the IP address highlight in green to 192.168.1.200
192.168.254.1 or 192.1168.254.254 – Set the IP address highlight in green to 192.168.254.200
Subnet Mask Should be 255.255.255.0, compare to the ipconfig details
Default gate will be your Router IP address
DNS you can use 1.1.1.1 (CloudFlare public DNS), 8.8.8.8 (Google public DNS) or your ISPs DNS server IP address.
You can now reconnect the other network cables if you have more than one network point.
You can now create a Bond, which will allow your NAS to use any of the network ports, which means all still works if you disconnect 1 network cable and if you have more than 1 device accessing the NAS, they would get a 1Gbps network interface each.
Click on Create, then select Bond
Select all the network ports
Select Adaptive Load Balancing
Click on IP4 and check the IP details are as you set above.
You have now passed Level 1 of Network Basics - CONGRATLUATIONS.
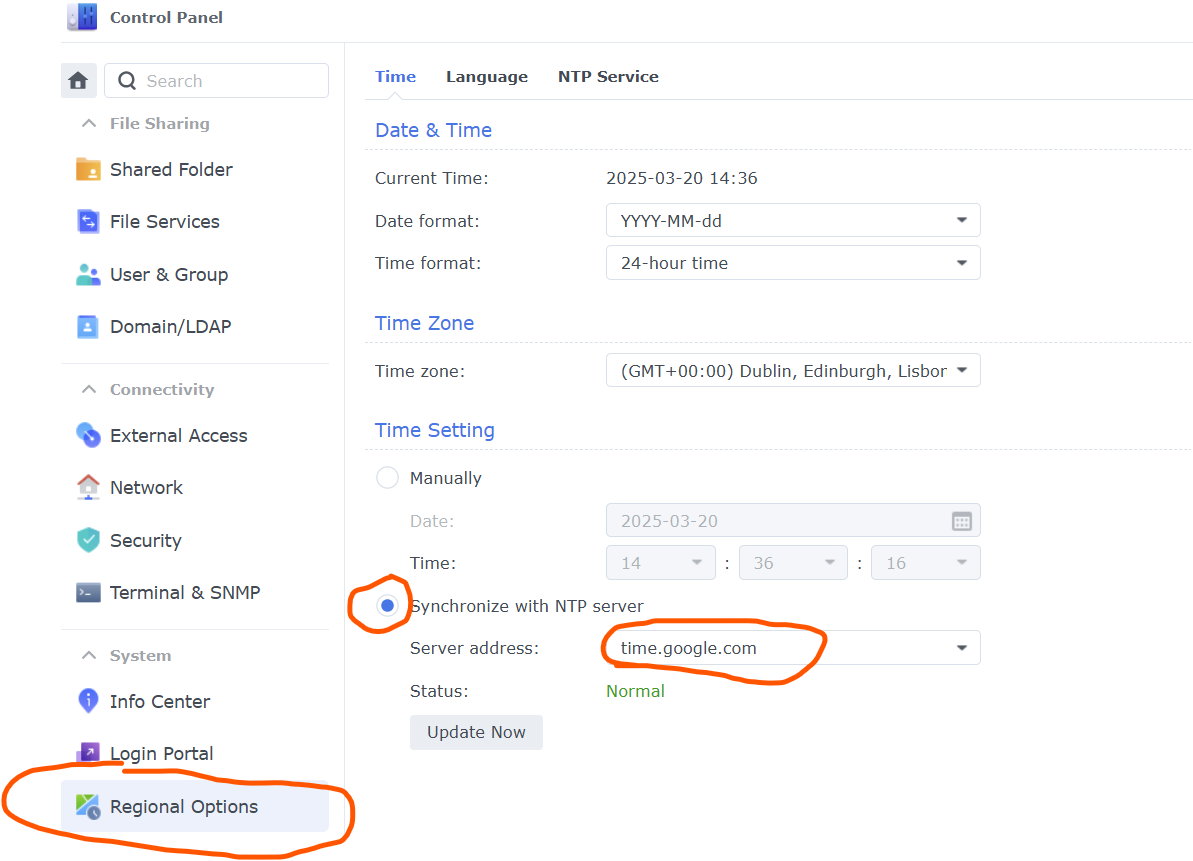
Regional Settings
Set the options for your country.
I suggest ticking Synchronise with the NTP Server as this will use the internet to keep the time and date correct.
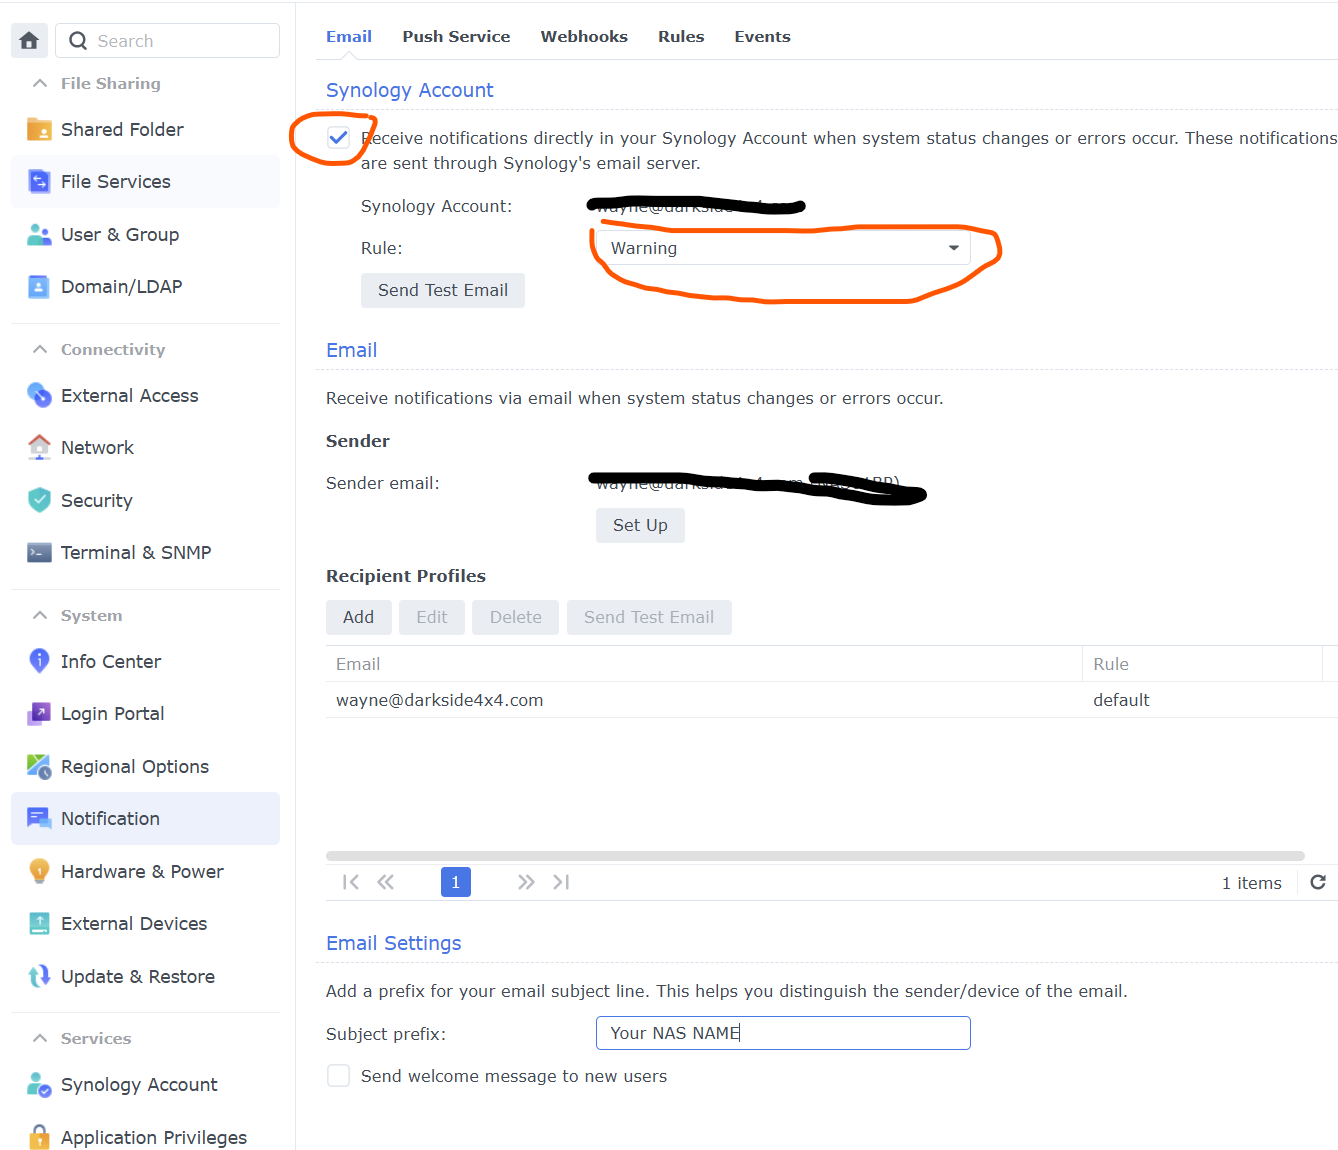
Notifications
Using the Synology account you set up early, you can set the NAS to email you when alerts happen.
Just change the items in red below.
To use the email section, it’s a little more complicated and you will need access to an SMTP server to relay your messages. Check with you email provider for details on SMTP relay servers.
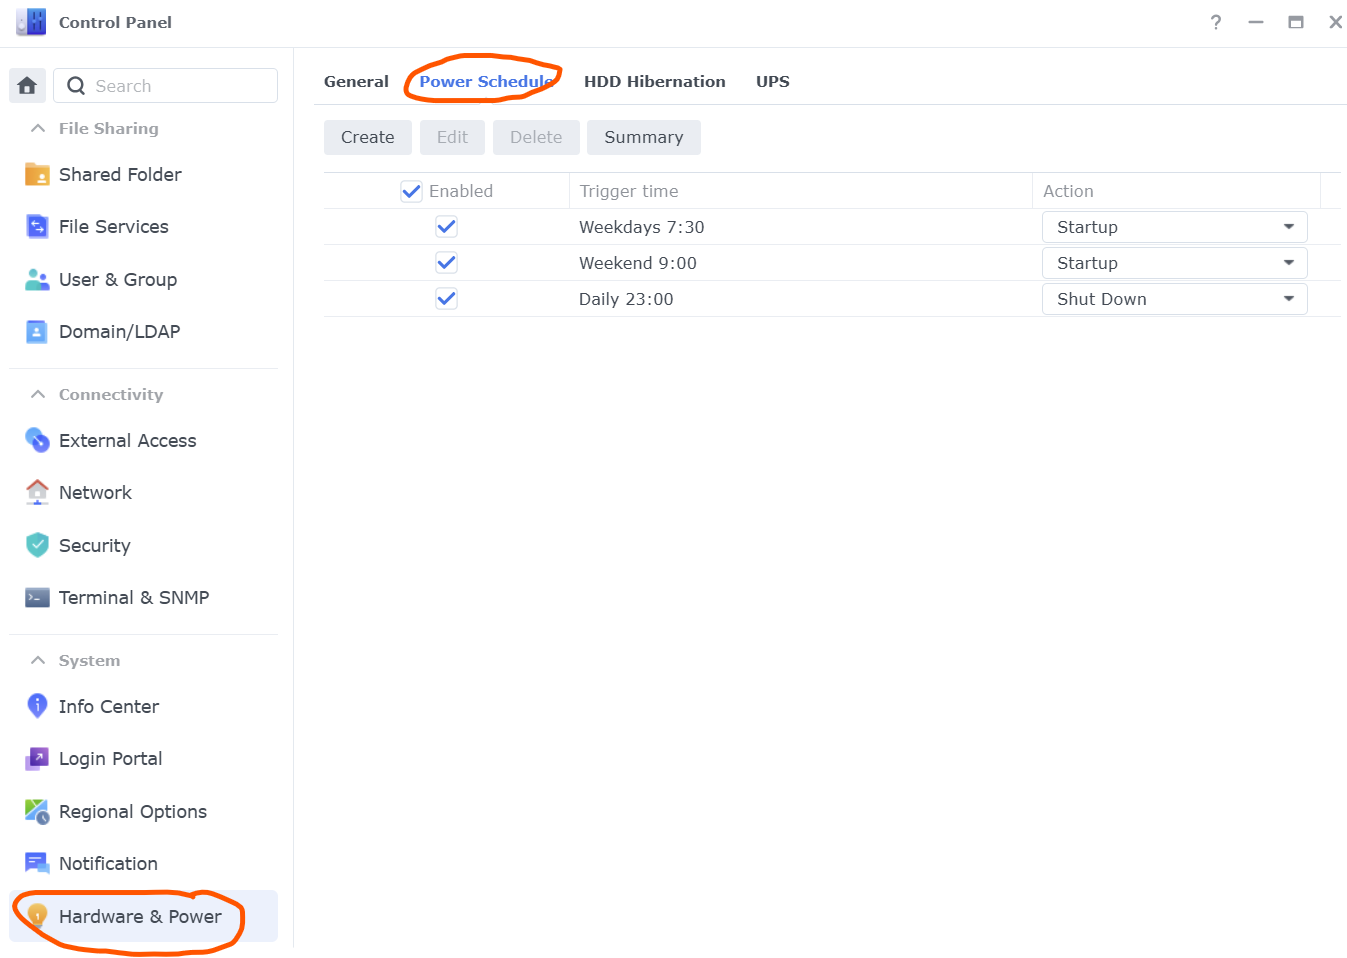
Power Schedule
To save power and reduce noise, you may want to set you NAS to power down at night.
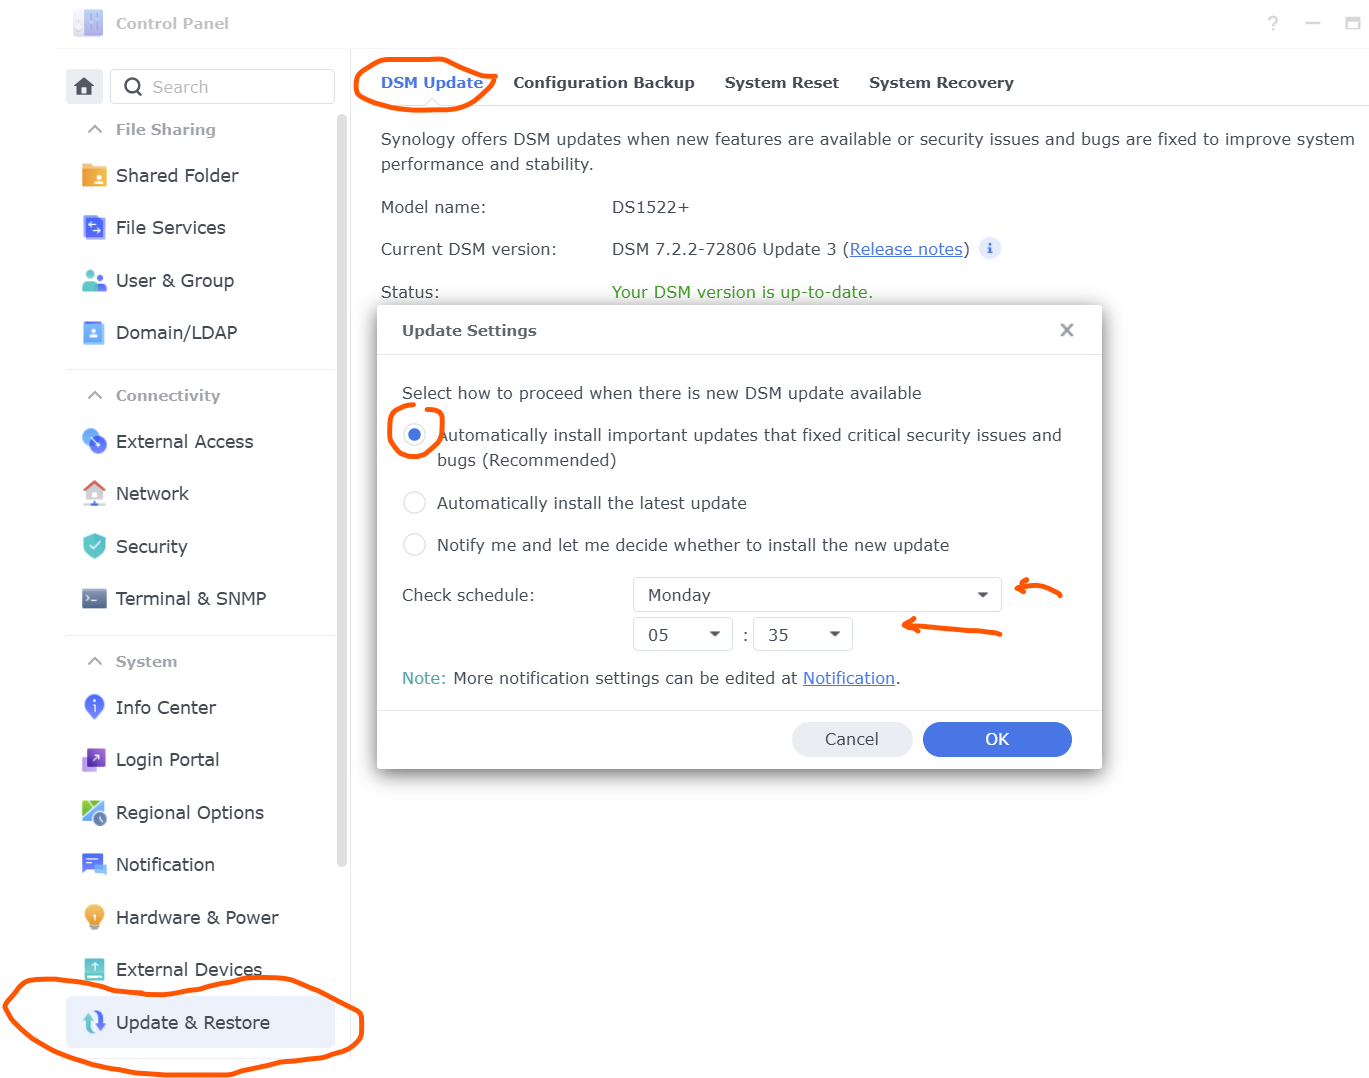
Update and Restore
Set you NAS to auto update at a time you won’t be using it.
NOTE: If you set a power schedule, don’t select a time when the NAS is powered down.
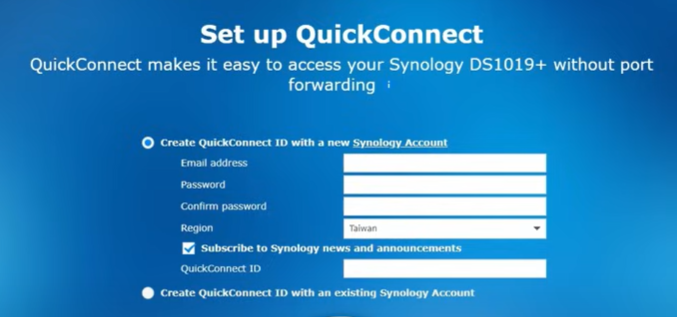
External Access
You will need this is you want to do any of the following:
- Use the Drive mobile app to access your files
- Access your files via the internet
- Use the Synology Drive Client to sync files to your PC, laptop or MAC
You will need to have set up your Synology Account first and I recommend you follow the security guidelines, especially 2-factor authentication.
Click Enable QuickConnect
Enter a QuickConnect ID. I suggest something nothing to do with your NAS name, something like BillAndBen01
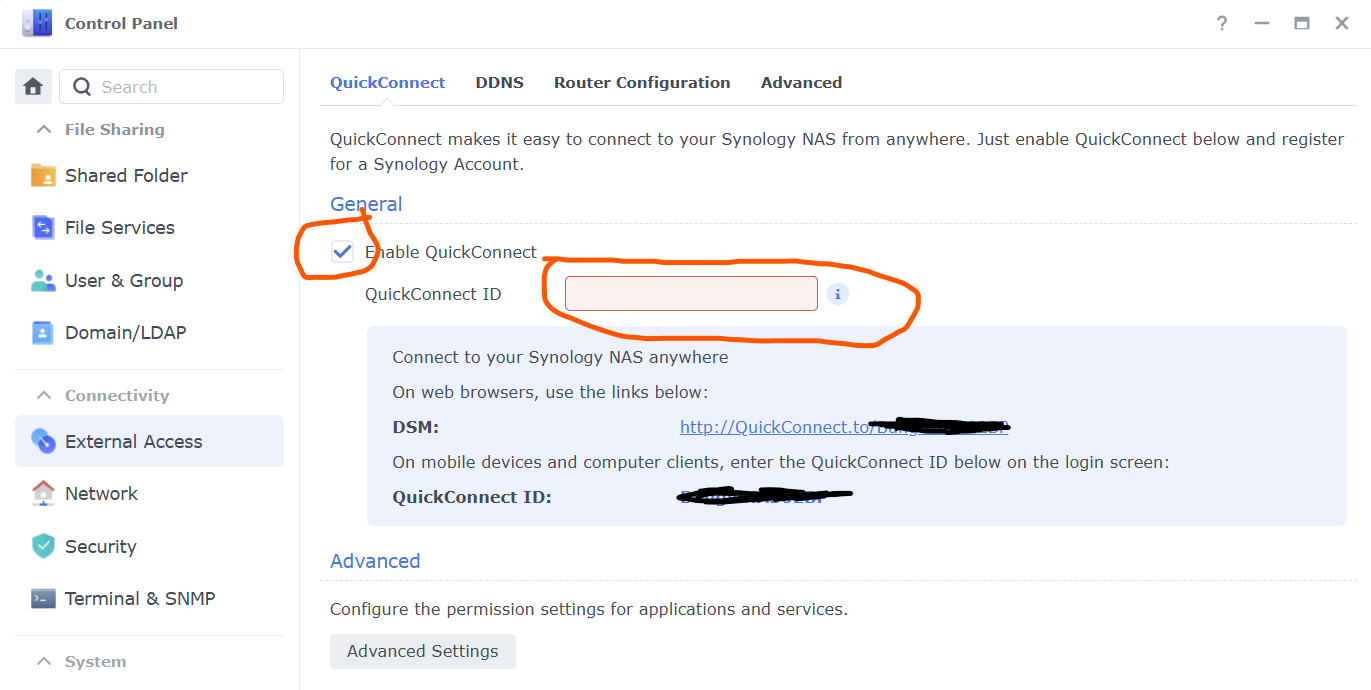
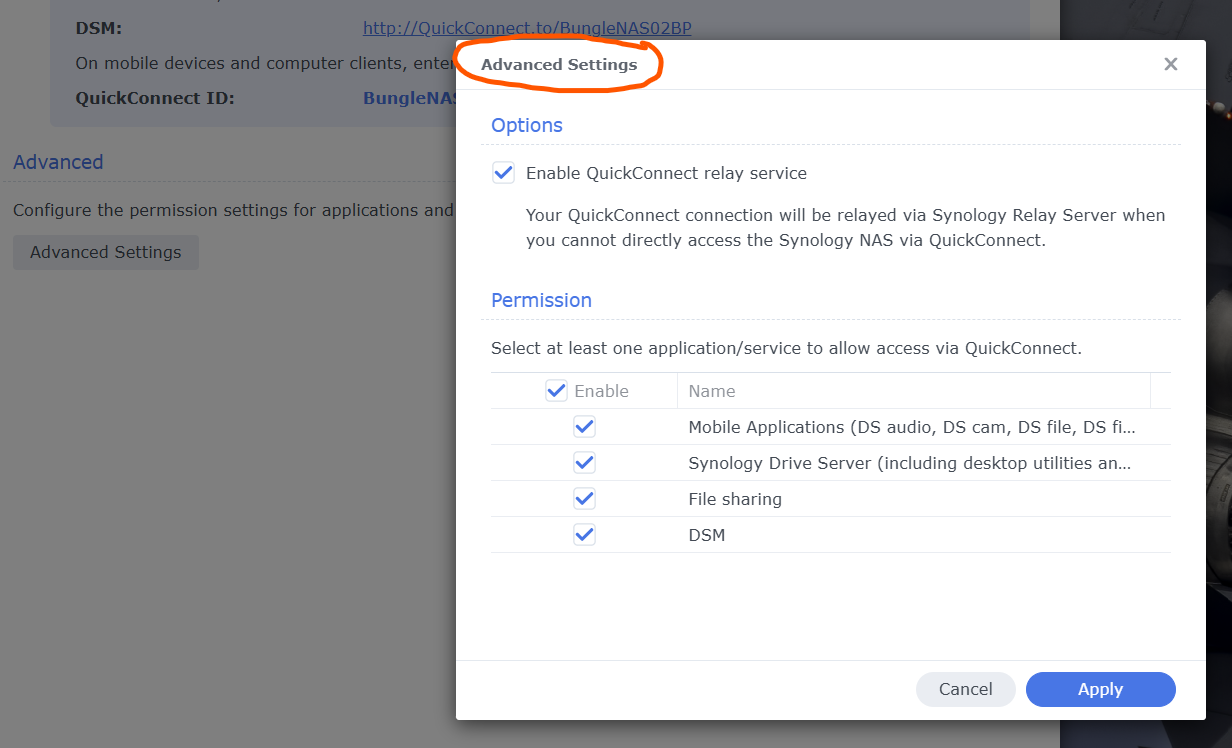
Go to Advance Settings and select the apps you want to have access to via QuickConnect.
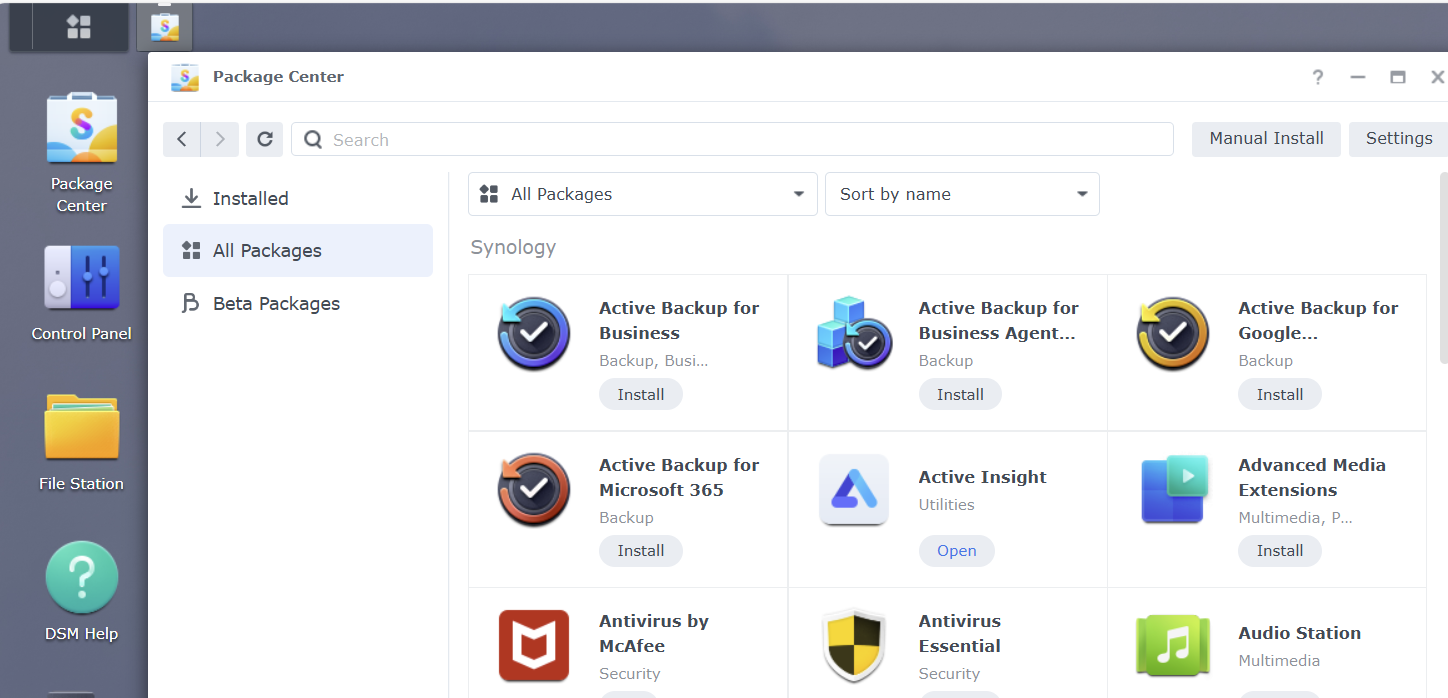
Package Center - Synology Apps
All apps are in the Package Center. 
This has three sections:
- Installed - Only shows the applications installed, some with be installed by default and other applications will automatically install apps they require.
- All packages - All installed and available apps split into Synology developed apps and apps that are either Open Source or from a Synology contributor.
- Beta Packages - Apps still in development.
To install an App, just click on it and you will see details before you proceed with the installation. Only install what you need, Apps will take up RAM and CPU time, so the more you install, the slower your NAS will become.
Below, if you wanted to install Virus Protections, there are two options.
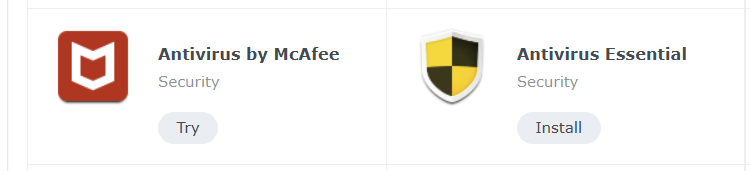
If you see Install, as with the Antivirus Essential, it is free, if you see Try, as in the AntiVirus by McAfee, after the trial period you will need to subscribe.
I’ll cover two recommend apps.
- Synology Drive Server
- Hyper Backup
Synology Drive Server
This is a comprehensive add-on solution that provides better file storage, management, sharing and synchronisation. It is free. You will need Quick ConnectConfiguring first.
Install the Synology Drive Server from the Package Center.
Overview.
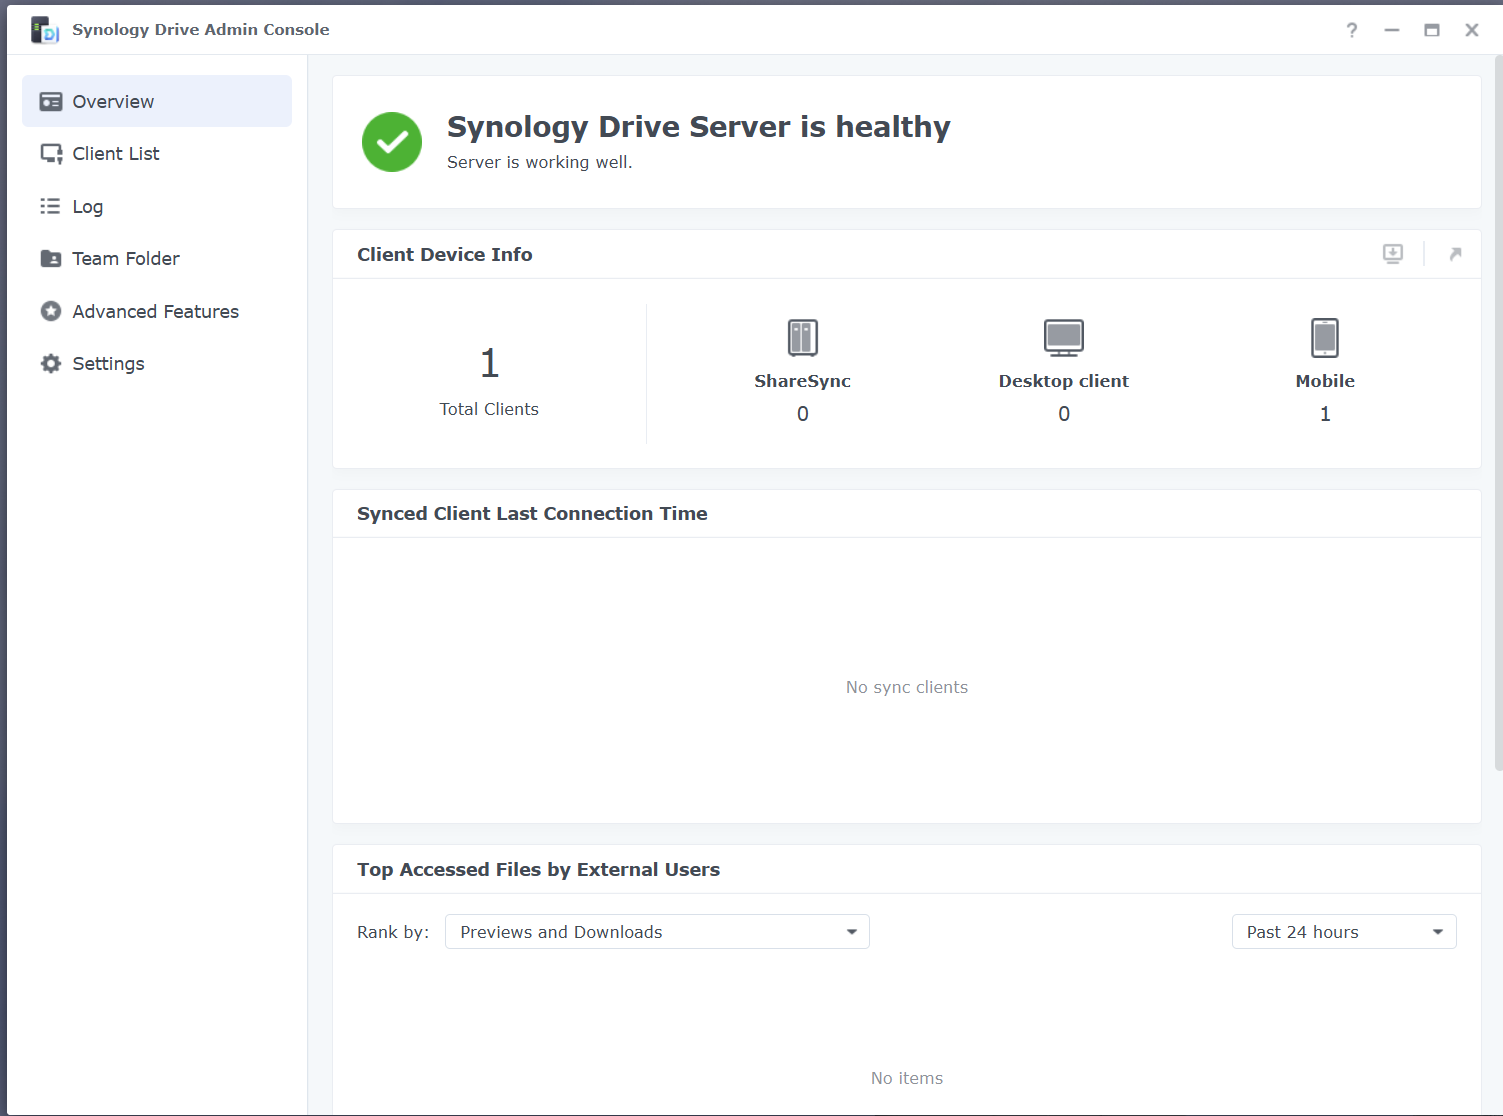
Client List – List all clients connecting via the Driver server, you will see my iPhone that is using the Drive mobile app listed.

Log shows you the activity, included uploads and download files.

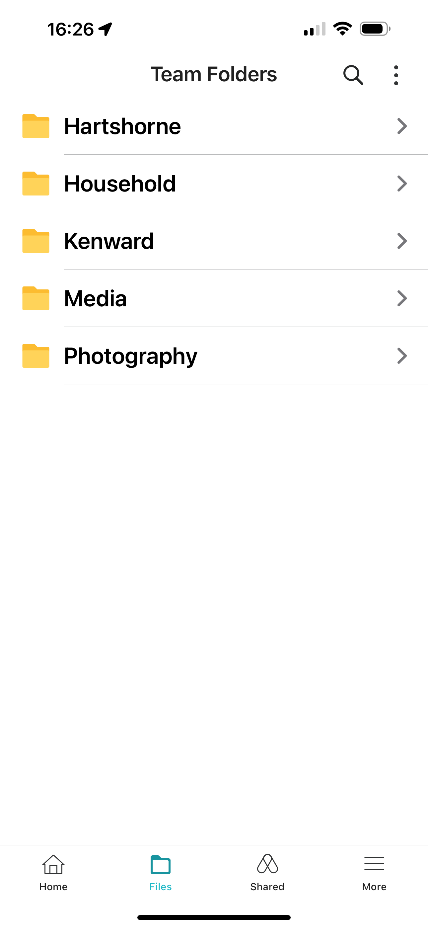
Team Folders – This is where we can configure file versioning.

You will see above I keep 32 version of all files on the Hartshorne, Kenward, and Household shared folders.
I only keep 4 versions of photos as with Lightroom doing no destructive edits, there is less chance of a corruption and I keep 2 copies of music files, as I can always re-rip my CDs or download the music.
NOTE – If they file isn’t changed, there will only be 1 version.
This means if I get a corruption in an Excel file and don’t notice it, I can bring back previous versions via the  app.
app.
The example below shows I have multiple versions I can restore of the spreadsheet that lists all my photography equipment.

Setting – gives you options for purging deleted items in the recycle bins, you can see how much space versioning is taking up and a whole host of other information.

If you want to sync two Synology NASs together in different locations, use Synology Drive ShareSync.
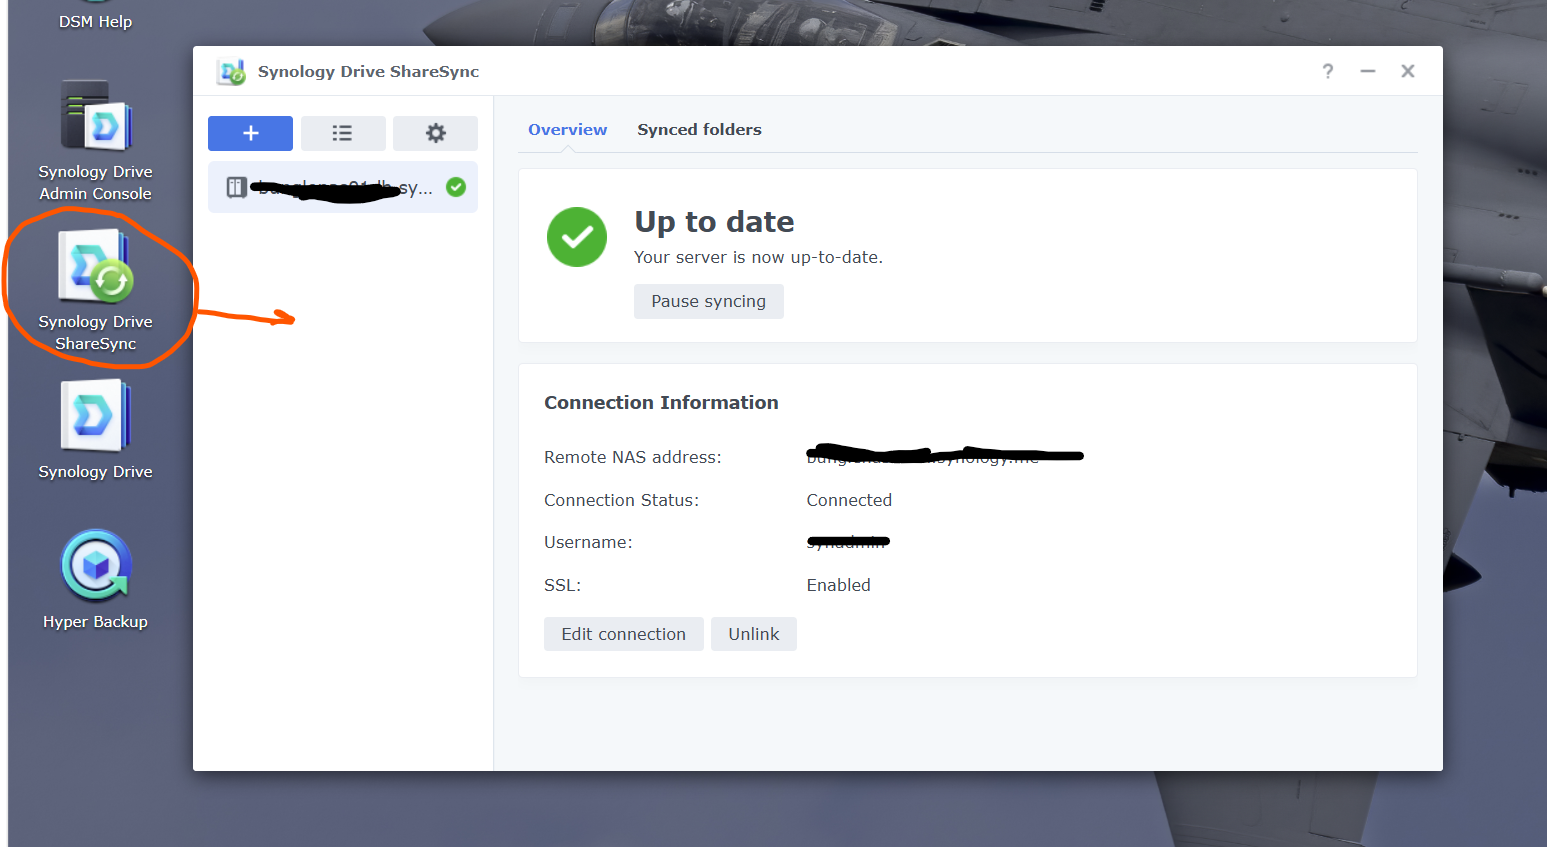
I won’t cover this on this blog, as most people won’t do this. It’s very easy to setup and I’m happy to help anyone who does need it.
Hyper Backup
A great free app which is ideal if you don’t have a NAS in a second location, to easily backup to a cloud provider.
You can select many cloud providers, like Microsoft Azure, AWS, Wasabi, Synology’s own cloud backup or any provider that supports S3 and C2 storage.
This guide covers most of what you will need to set this up.
Hyper Backup Quick Start Guide - Synology Knowledge Center
A word of warning, check the costs first as this may end up costing you hundreds of £$€ each year, but how much is peace of mind worth knowing your one of a kind images are all safe.
Connection to you NAS.
Now this section is over and hopefully you are still with me and your NAS is online, secure and fully configured, I’ll cover connecting to your NAS.
I’ll cover Windows and IOS, if someone wants to do a guide for MAC OS and Android, I’m happy to add this in.
Connect via Windows:
There are several ways to access your data on your NAS for a Windows systems. They range from easy to geek.
Easy first.
Synology Assistant It can be download from https://www.synology.com/en-us/support/download
Once installed, the Synology Assistant will scan you network and list all the Synology NASs it can find.

Select you NAS and click on Map Drive

When prompted for a user name and password, use your USER ID, not the Admin ID.
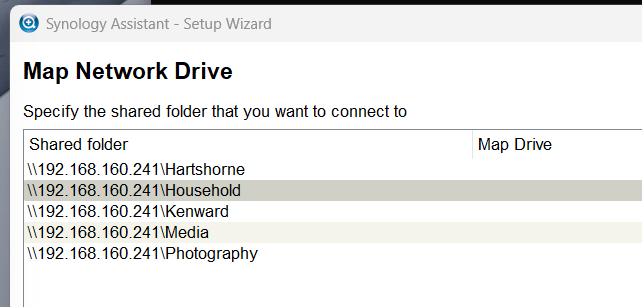
You will see a list of your shared folders.
Highlight the folder you want to connect to.
Select the drive letter you want to use and tick Reconnect at logon
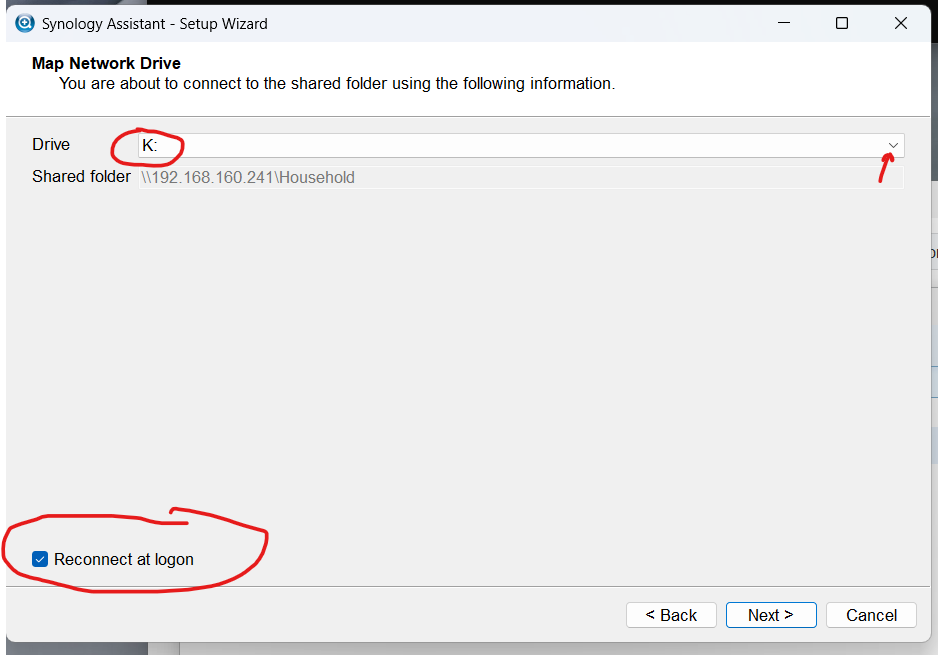
Repeat for all folders you want to connect to selecting a different drive letter for each.
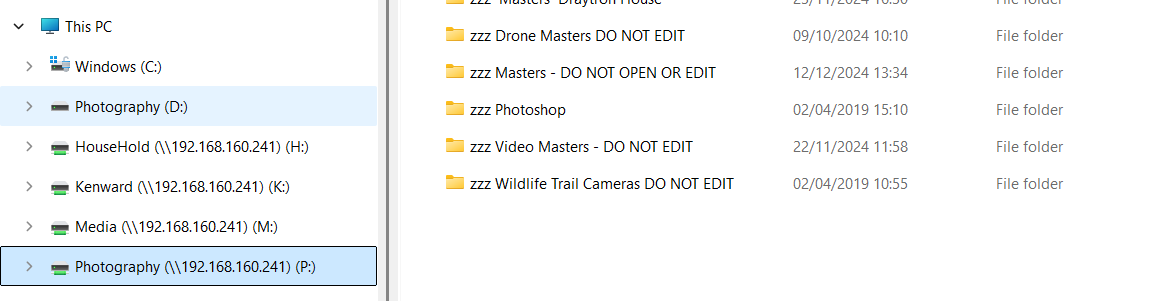
You will then have access to all your folders in Windows.
Geek Way – being old school and because my laptop needs to connect to my NAS at home and then to the NAS in my office when I’m at work, I use scripts to map my drives. (I can see so many skipping this section).
I have 2 scripts with desktop shortcut icons to them.
This is the script.
net use d: /d

net use h: /d

net use k: /d

net use m: /d

net use p: /d

net use h: \\192.168.160.241\HouseHold /PERSISTENT:YES /user:”MY NAS Name ort IP”\”my user name”

net use k: \\192.168.160.241\Kenward /PERSISTENT:YES / user:”MY NAS Name ort IP”\”my user name”

net use m: \\192.168.160.241\Media /PERSISTENT:YES / user:”MY NAS Name ort IP”\”my user name”

net use p: \\192.168.160.241\Photography /PERSISTENT:YES / user:”MY NAS Name ort IP”\”my user name”
Connect via Web Browser:
If you are on the same network as you NAS, type the IP address of your NAS into the browser, or if remote, use the QuickConnect web address http://QuickConnect.to/your quick connect name
Log in with your USER ID, password and 2FA/MFA.
Then access:
Default app
Or
If you have installed the Synology Drive Server
Connect via Drive mobile App:
Add a new NAS and enter your quick connect name, keep HTTPS on.
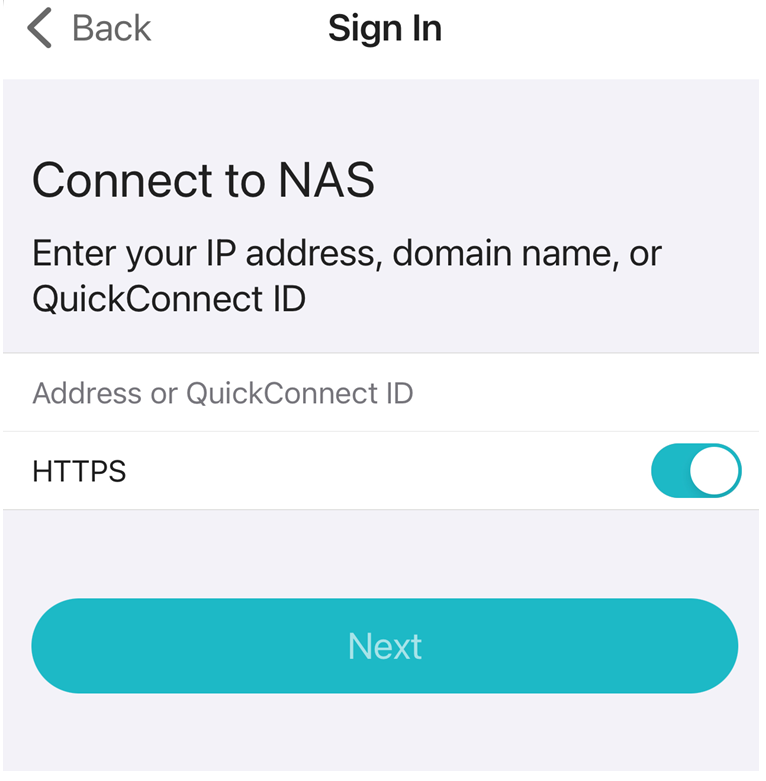
Once in you will see all your folders that you have access to.
Continue to Part 4 at Blog: Using Your Synology NAS with Lightroom Classic | COAP Online to finish setting up your NAS to work with Lightroom Classic
Did you know our blogs are written exclusively by our members? We'd love for you to come and experience what COAP Online is all about!
Not yet a member?
Enjoy a free 30-day trial!
COAP Online membership brings 100s of aviation photographers from around the world together in a friendly, helpful and inspirational community. You'll enjoy monthly challenges, competitions, livestreams, blogs, exclusive discounts, meet-ups and more!
Get a free tutorial to your inbox every week!
Subscribe to our mailing list to receive a fantastic aviation photography tutorial to your inbox every Tuesday!
We hate spam as much as you. We will never sell your information, for any reason.